Text View Features
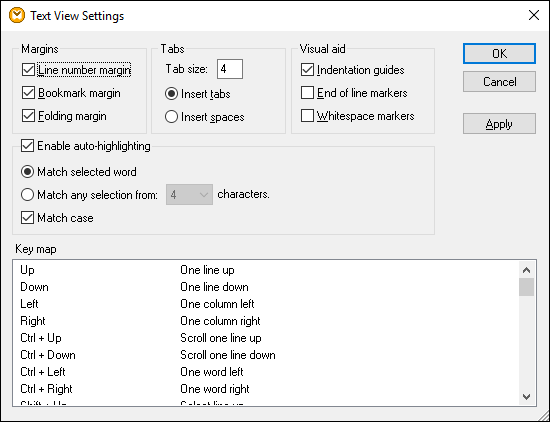
The Output pane and the XSLT pane have multiple visual aids to make the display of text easier: e.g., margins, text highlighting, indentation guides, end-of-line and whitespace markers. You can customize these features in the Text View Settings dialog box (see screenshot below). The settings in this dialog box apply to the entire application.

To open the Text View Settings dialog box, do one of the following:
•Select Output | Text View Settings.
•Click ![]() (Text View Settings) in the toolbar.
(Text View Settings) in the toolbar.
•Right-click the blank area in the Output pane and select Text View Settings from the context menu.
Some of the navigation aids can also be toggled from the Text View toolbar, the application menu, or keyboard shortcuts. For more more information about shortcuts, see the Key map section of the Text View Settings dialog box shown above.
See the list of available settings below.
The Enable auto-highlighting setting allows you to see all the matches of the selected piece of text. The selection is highlighted in pale blue, and the matches are highlighted in light brown. The selection and its matches are indicated as gray marker-squares in the scroll bar. The current cursor position is shown as the blue cursor-marker in the scroll bar. A selection can be an entire word or a fixed number of characters. You can also specify whether case should be taken into account or not.
For character selection, you can specify the minimum number of characters that must match, starting from the first character in the selection. For example, you can choose to match two or more characters. For word searches, the following items are considered to be separate words: element names (without angular brackets), the angular brackets of element tags, attribute names, and attribute values without quotes.
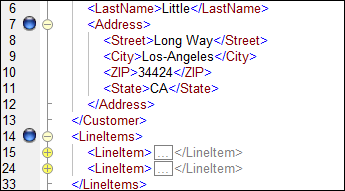
|
Indentation guidesIndentation guides are vertical lines that indicate the extent of a line's indentation. They can be toggled on and off in the Text View Settings dialog box. The Insert tabs and Insert spaces options take effect when you use the option Output | Pretty-Print XML Text.
End-of-line and whitespace markersEnd-of-line and whitespace markers (see screenshot below) can be toggled on in the Text View Settings dialog box. The arrows represent tab characters. The CR abbreviation stands for a carriage return. The dots represent space characters.  |
Syntax coloringSyntax coloring is another visual aid that makes code listings more reader-friendly. Syntax coloring depends on the semantic value of the text. For example, in XML documents, depending on whether the XML node is an element, attribute, content, CDATA section, comment, or processing instruction, the node name (and in some cases the node's content) is colored differently.
Zooming in and outYou can zoom in and out by scrolling (with the scroll-wheel of the mouse) while holding the Ctrl key pressed. Alternatively, press the - or + keys while holding the Ctrl key pressed.
Pretty-printingThe Pretty-Print XML Text command reformats the active XML document in Text View to give a structured display of the document. By default, each child node is separated from its parent by four space characters. This can be customized in the Text View Settings dialog box. To pretty-print an XML document, select the menu command Output | Pretty-Print XML Text or click
Word wrappingWord wrapping helps display a code listing within the borders of the working area. If the word wrap setting is not enabled, some portions of text may not be fully visible in the working area. To toggle word wrapping in the currently active document, select the menu command Output | Word Wrap or click |


