Creating and Applying Custom Profiles
The instructions below show you how to create a custom UModel profile and apply it to a package. This is typically required if you need to create and apply stereotypes beyond those included in the default UModel profiles. For information about applying the default UModel profiles, see Applying UModel Profiles.
To create a custom profile:
1.Right-click the package where you would like to create the new profile, (for example, "Root"), and select New element | Profile from the context menu.
2.Create all the elements that should be part of this profile, such as stereotypes, data types, and so on. You can do this either in the Model Tree window or from a profile diagram. For example, to create a new stereotype in the model, right-click the profile and select New element | Stereotype from the context menu. See also Creating Stereotypes.
3.Optionally, create a profile diagram (right-click the profile and select New diagram | Profile diagram from the context menu). To add all the required elements to the diagram, use the standard UModel menu commands and toolbars, see How to Model....
If you would like to create the profile from a profile diagram, make sure that the diagram is owned by (created under) a profile, or by a package inside a profile. |
In addition, if you would like to reuse the profile across multiple UModel projects, do the following:
1.Share any packages that you want to make reusable. (Right-click the package or the profile itself, and select Subproject | Share package from the context menu.)
2.Save the project to a directory from where you can later include it as a subproject, see Including Subprojects.
So far, you have created a profile but have not added (or applied) it to any package. By applying a profile to a package, you make all of the extension mechanisms of that profile (such as stereotypes, data types, and so on) available to elements of the package.
To apply a custom profile to a package:
1.Create a new UModel project, or open an existing one.
2.Do one of the following:
a.Create your custom profile in the existing project, as shown above.
b.Include a custom profile from an existing project using the menu command Project | Include Subproject. Note that either the entire profile or its packages under must be shared in order to be reusable, see Sharing Packages and Diagrams .
3.Right-click the profile and select New diagram | Profile diagram from the context menu.
4.Add some package(s) and the custom profile to the diagram.
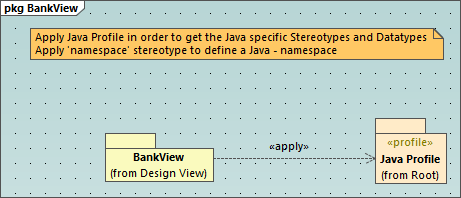
5.Draw a ProfileApplication ![]() relationship from the package to the profile. For example, the profile diagram below illustrates a ProfileApplication relationship between the package BankView and the Java profile built into UModel. As illustrated below, profile applications are shown as dashed arrows from the package to the applied profile, along with the <<apply>> keyword.
relationship from the package to the profile. For example, the profile diagram below illustrates a ProfileApplication relationship between the package BankView and the Java profile built into UModel. As illustrated below, profile applications are shown as dashed arrows from the package to the applied profile, along with the <<apply>> keyword.
