Enable SSL for LicenseServer
After you have obtained your private key and your certificate file/s, you can enable encrypted connection between LicenseServer and its Web UI as follows:
1.Open the Configuration page as described in the sections Open LicenseServer Config Page (Windows), Open LicenseServer Config Page (Linux) and Open LicenseServer's Config Page (macOS).
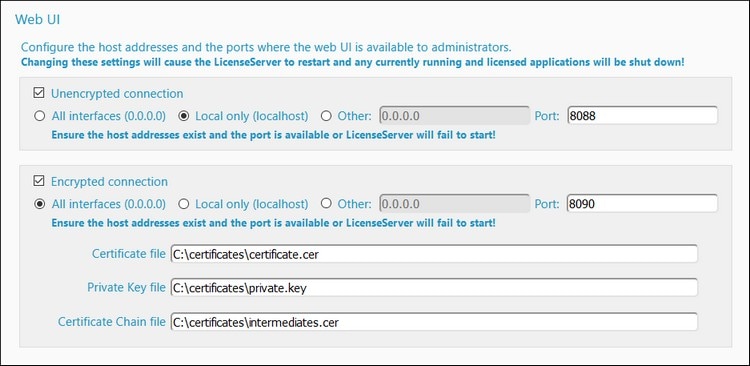
2.Go to the Settings tab and then to the Web UI pane (screenshot below).
3.Check Encrypted Connection.
4.Select the interface/s where the web interface should listen for SSL encrypted connections. If you select Other, the host address that you enter must correspond to the SSL certificate's Common Name entry.
5.Enter the port number for SSL encrypted connections.
6.Enter the path of, respectively, the certificate file and the private key file.
7.If intermediary certificate files were used to create the final certificate (public key) file, then, in the Certificate Chain File field, enter the path to the intermediate certificates file. Intermediate files are usually used when certificates are created by Certificate Authorities.
8.You can now set whether you want unencrypted connections additionally. If you deselect Unencrypted Connection, then LicenseServer will be unavailable through plain HTTP. So you should take this step only after making sure that SSL-encrypted connection works. Instead of disabling the HTTP connection completely, you may want to restrict it to local connections only, as shown in the screenshot above.
9.Click Save to finish. The server will be restarted, and the browser will be redirected to the https (not http) URL.
CautionIf the SSL settings are not configured correctly or if there is a certificate problem, you may no longer be able to access the Web UI. In this case, either use the URL of the unencrypted connection (if this is enabled), or change the SSL settings manually in the server.cfg file (see below).
Alternatively, you can rename the server configuration file (server.cfg) and restart Altova LicenseServer as a service. On restarting the service, a new server configuration file with the default connection settings will be created and you will be able to access the Web UI. (Note that the service will also restart—automatically—if you change a server setting and save.)
|
Manually editing the server.cfg file
The server.cfg file is stored at the following locations:
Windows | C:\ProgramData\Altova\LicenseServer |
Linux | /var/opt/Altova/LicenseServer |
macOS | /var/Altova/LicenseServer |
The relevant lines of the file are listed below with documentation comments in green. The settings in the listing below correspond to the settings in the screenshot above.
server.cfg
=========
[Listen] //Settings for Unencrypted connections
active = 1 // Set active = 1 to enable Unencrypted connections
hostkind = local
hostcustom = 0.0.0.0
host = localhost
port = 8088
[ListenSSL] //Settings for Encrypted connections
active = 1 // Set active = 0 to disable Encrypted connections
hostkind = all
hostcustom = 0.0.0.0
host = 0.0.0.0
port = 8090
ssl = 1
[SSL]
certificate = C:\certificates\certificate.cer
private_key = C:\certificates\private.key
certificate_chain = C:\certificates\intermediates.cer
