Workflows
The Workflows tab (screenshot below, showing the Advanced edition) provides an interface for managing the container structure of the root folder of MobileTogether Server and the access rights (permissions) for each container. Containers are folders that contain sub-containers and/or solutions (also called design files or .mtd files). MTD files cannot be added to a container via the server's Web UI, but are deployed to the server from MobileTogether Designer. At deployment, the exact path to a container must be specified; this is facilitated by being able to browse, in MobileTogether Designer, to the required container.
•The Workflows tab initially displays the root container, which is denoted by the "/" character.
•Click the Down arrows next to a container's name to display the sub-containers of that container; click a sub-container in the pop-up list to go to that sub-container.
•To go to a container, click it.
•Every level that you descend in the hierarchy of containers is displayed at the top of the window as a "breadcrumbs" path. The Down arrow of each level displays the sub-containers of that container, so you can navigate easily to different containers.

•To select a container, click the container's check box. Selections are used for renaming, moving, and deleting containers (see Functionality below).
The buttons of the tab provide the following functionality:
Other available actions:•To navigate up the container hierarchy, click the required ancestor folder in the path at the top of the Workflows tab •To navigate down the container hierarchy, click a container to open it •Click a solution file's URL to run the solution
Input parametersYou can specify input parameters in the form "Key1=Value1;Key2=Value2;...;KeyN=ValueN". If a value has spaces, use quotes around it. These parameter values are passed to the solution when the solution is started and stored in the solution's MT_InputParameters global variable (for information about which, see the MobileTogether Designer user manual). Input parameters can then be used inside the solution to achieve different goals. For example, if you specify the input parameter "Department=Sales", then it would be possible to filter your database to only show records of the department named Sales.
You can specify the input parameters of a solution in one of the following ways:
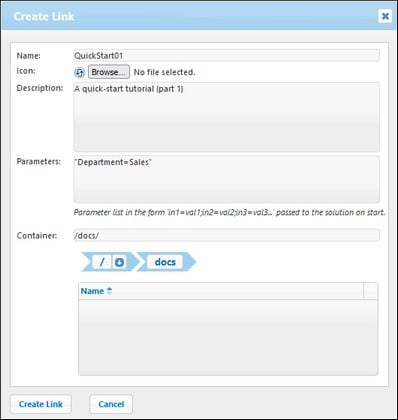
•Click the Wheel icon located after the name of the solution. This opens the Change Object dialog, in which you can specify the solution's input parameters. •Select a solution and click Create Link. In the Create Link dialog that appears, enter the solution's input parameters (see the dialog's description below).
Note: The MT_InputParameters global variable of a solution can receive input parameters not only from this MobileTogether Server entry point, but also from design-related originating points (see the MobileTogether Designer user manual). In such cases, the input parameters are merged. If the key name is the same, then the value defined for shortcuts in MobileTogether Server wins and will be the value that is assigned to the key.
Create linkYou can create a link to a solution and place the link in a container that is not the same as the one containing the solution. This enables a solution to be accessed from different containers. The advantage of this is that by using different input parameters for each link, you can cause the solution to appear in different ways when opened via different links. For example, you could create a link in a container named Sales and give it an input parameter "Department=Sales". In the solution, you can specify that when the solution is opened it will be filtered on the value of the department name in its input parameter. So, when the solution is opened via the link in the Sales container, the solution's records will be filtered to show, because of its input parameter, only the records of the Sales department. You could create other links in other containers (say, for Accounts or Legal), and set corresponding input parameters for them. When the solution is opened via these links, the records that are displayed would then be filtered for the appropriate department. The solution that is opened in all these cases would be the original solution. The Link feature enables you to present and process the solution in different ways according to the input parameters corresponding to each link. Alternatively to the example case described above, the availability of parameters enables various other scenarios. For example, one powerful use case would be the possibility of using an alternative database for the solution.
Note, however, that in all these cases, what happens when the parameter value is passed to the solution depends entirely on how the parameter is handled in the design.
Whether it is necessary to remove persistent data or not depends on what has been defined to happen when the parameter value is passed to the solution. If the parameter value has a consequence that is stored as persistent data, then you might want to clear persistent data; otherwise, it is not necessary. Note also the converse effect of removing persistent data. In this case, the solution will not have access to persistent data. It will try to use data supplied via parameters and, if this data does not substitute well for the removed persistent data, then the solution could start with some data missing or with inappropriate data.
|
Clicking the public container opens the container and displays its contents. public is a predefined container containing sample design files (solutions) that are delivered with the program. Click a solution's URL to run it.
|
A container contains sub-containers and/or solutions (aka design files or .mtd files). The contents of each container are displayed as a tabular list. The columns of the table display the properties of solutions:
•Name: Name of the solution file as saved in MobileTogether Designer. •App, App version: The App and App Ver columns appear only if at least one AppStore App (see the MobileTogether Designer user manual) has been deployed to the server. They display, respectively, the name of the AppStore App and its version. •Description: Short description of the solution. •Design Version: Version of MobileTogether Designer in which the solution was created. •Last Deployed On: The date and time of the solution's last deployment. •Last Accessed On: The date and time when the solution was last accessed. •Global Resource Configuration: The global resource that has been defined for that solution and deployed to the server. If no global resource is specified, Default is displayed. •Persistent Data: A Clear button appears in this column if data has been changed while running the solution and persists in the solution. Click this button if you wish to undo the changes. Also see the note in the Functionality section above | Create Shortcut Link. •Automated Test: A blue wheel indicates that at least one test run for automated testing of that solution is available, but that no test run is active. A red wheel indicates that at least one test run of the available test runs is active. To activate a design's test run or configure how the test run is played back on the client, click the solution's wheel icon (shown in the screenshot above). This displays a page showing the automated tests of that solution (see next section below). Clicking the wheel in the column header filters the display to show only those solutions in the current folder and descendant folders that contain automated tests. For information about Automated Testing, see the MobileTogether Designer documentation. •Run in Browser: The server URL where the solution file is deployed. Click to run the solution. (For AppStore Apps, no URL is displayed because the AppStore App cannot be opened in a web browser.)
|
When you click the wheel icon in a solution's Automated Test column, a configuration page is displayed that shows the automated tests of that solution (screenshot below). The Automated Tests page shows all the test runs that have been deployed for the selected solution. You can set up individual test runs for playback on client devices as follows:
1.In the Active column, check the test runs that you want to make active. These test runs can then be played back on the client. If multiple test runs are selected, then all the selected test runs will be played back when automated testing is started on the client. If any one of a solution's test runs has been activated, then, on the Workflows page, the wheel in the design's Automated Test column is displayed in red. If you want to play back a test run on the Web client, then on the Workflows page, click the Playback icon in the solution's Automated Test column. 2.Set the speed of the test run in the Run Type column. You can set the speed for all test runs at once by selecting the speed in the dropdown list of the column header. 3.Set the logging details you want during playback. Do this by checking the columns you want. See the Automated Testing section in the MobileTogether Designer documentation for information about these options. 4.Click Save to finish.
If you wish to delete a test run, select its check box in the leftmost column and click Delete Selected.
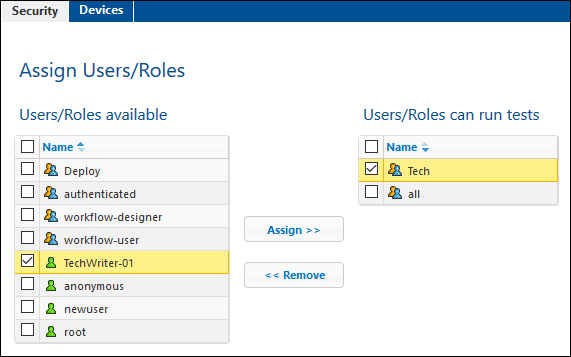
PermissionsIn the lower part of the Automated Tests page (screenshot below), you can specify: (i) what users and roles can run automated tests for the selected solution (in the Security tab), and (ii) the devices on which test runs can be carried out (selected in the Devices tab).

•Users and roles are selected in the Security tab, devices are selected in the Devices tab (see screenshot above). •To assign a user/role or device to the Allowed list, select it in the left pane and click Assign (see screenshot above). •Remove a user/role or device from the Allowed list by selecting it and clicking Remove. •You can assign or remove multiple selections at a time. •If no device is assigned to the Allowed list, then test runs for that solution can be run on all devices.
Note: All automated tests that were deployed prior to an upgrade of the server to version 4.1 (released 27 February 2018) or later will get security permissions for all users/roles; that is, all users/roles can run automated tests, which is the same behavior as that prior to the upgrade. For automated tests that are deployed subsequent to an upgrade to version 4.1, security permissions are set for no user/role; that is, any user or role that may run automated tests must be explicitly specified.
|
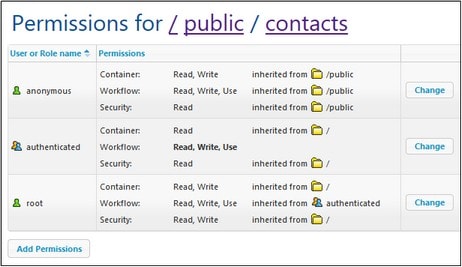
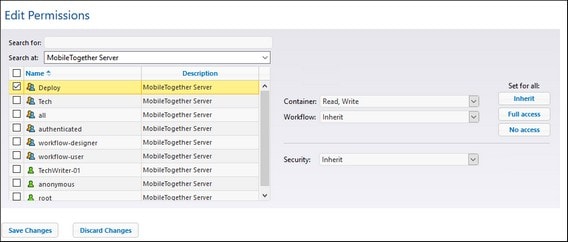
Permissions are access rights, and they can be set for each container individually. Permissions determine which users or roles have access to that container, and what kind of access each user/role has (read, write, use). These access rights can be set for the container, its workflows (or solutions), and read/write security.
Permissions are checked for every user interaction. A user can only successfully access and/or edit when all required permissions are granted. Permissions are set for the following groups:
Container•Read: The user can list the contents and find an object in the container. •Read-Write: Additional to read, can create new (and delete existing) objects, depending on other permissions that may apply. •Inherit: Inherit permissions from the parent container. •No access: Access to the container is not granted.
Workflow•Read-Use: The user can run solutions. •Read-Write-Use: The user can additionally overwrite solutions, that is, deploy solutions. •Inherit: Inherit permissions from the parent container. •No access: Access to workflows is not granted.
Security•Read: The user is permitted to read the permission list of any child object of the container. •Read-Write: The user can additionally change the permissions list of any child object of the container. •By default a user is permitted to read only permissions assigned to it or a role it is a member of. If the Read Users and Roles privilege is granted (see Users and Roles), users can read all permission entries. •Inherit: Inherit permissions from the parent container. •No access: Access to the permission list is not granted.
|


