Example: Map Element Names to Attribute Values
This example shows you how to map element names from an XML document to attribute values in a target XML document. The example is accompanied by a sample mapping, which is available at the following path: <Documents>\Altova\MapForce2025\MapForceExamples\Tutorial\ConvertProducts.mfd.
To understand what the example does, let's assume you have an XML file that contains a list of products. Each product has the following format:
<product> <id>1</id> <color>red</color> <size>10</size> </product> |
Your goal is to convert information about each product into name-value pairs, for example:
<product> |
To perform a data mapping such as the one above with minimum effort, this example uses a MapForce feature known as "dynamic access to node names". "Dynamic" means that, when the mapping runs, it can read the node names (not just values) and use these names as values. You can create the required mapping in a few simple steps, as shown below.
Step 1: Add the source XML component to the mapping
•On the Insert menu, click XML Schema/File, and browse for the following file: <Documents>\Altova\MapForce2025\MapForceExamples\Tutorial\Products.xml. This XML file points to the Products.xsd schema located in the same folder.
Step 2: Add the target XML component to the mapping
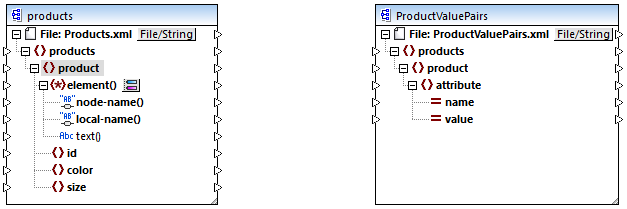
•On the Insert menu, click XML Schema/File, and browse for the following schema file: <Documents>\Altova\MapForce2025\MapForceExamples\Tutorial\ProductValuePairs.xsd. When prompted to supply an instance file, click Skip. When prompted to select a root element, select products as root element.
At this stage, the mapping should look as follows:

Step 3: Enable dynamic access to child nodes
1.Right-click the product node on the source component, and select Show Child Elements with Dynamic Name from the context menu.
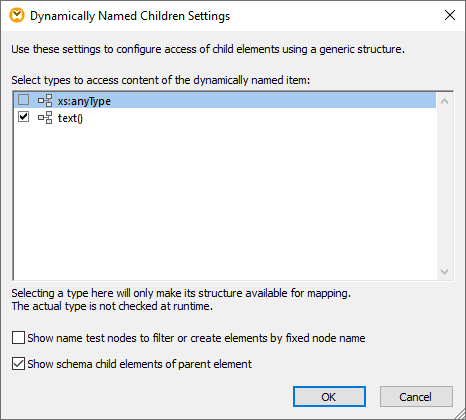
2.In the dialog box which opens, select text() as type. Leave other options as is.

Notice that a text() node has been added on the source component. This node will supply the content of each child item to the mapping (in this case, the value of "id", "color", and "size").

Step 4: Draw the mapping connections
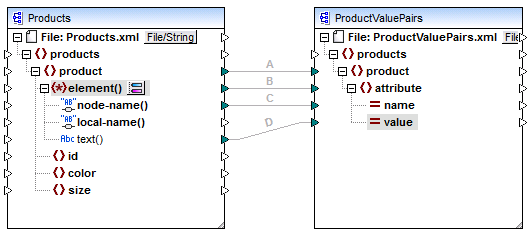
Finally, draw the mapping connections A, B, C, D as illustrated below. Optionally, double-click each connection, starting from the top one, and enter the text "A", "B", "C", and "D", respectively, into the Description box.

ConvertProducts.mfd
In the mapping illustrated above, connection A creates, for each product in the source, a product in the target. So far, this is a standard MapForce connection that does not address the node names in any way. The connection B, however, creates, for each encountered child element of product, a new element in the target called attribute.
Connection B is a crucial connection in the mapping. To reiterate the goal of this connection, it carries a sequence of child elements of product from the source to the target. It does not carry the actual names or values. Therefore, it must be understood as follows: if the source element() has N child elements, create N instances of that item in the target. In this particular case, product in the source has three children elements (id, color and size). This means that each product in the target will have three child elements with the name attribute.
Although not illustrated in this example, the same rule is used to map child elements of attribute(): if the source attribute() item has N child attributes, create N instances of that item in the target. |
Next, connection C copies the actual name of each child element of product to the target (literally, "id", "color", and "size").
Finally, connection D copies the value of each child element of product, as string type, to the target.
To preview the mapping output, click the Output pane and observe the generated XML. As expected, the output contains several products whose data is stored as name-value pairs, which was the intended goal of this mapping.
<?xml version="1.0" encoding="UTF-8"?> |
Generated mapping output