Taxonomy Editor
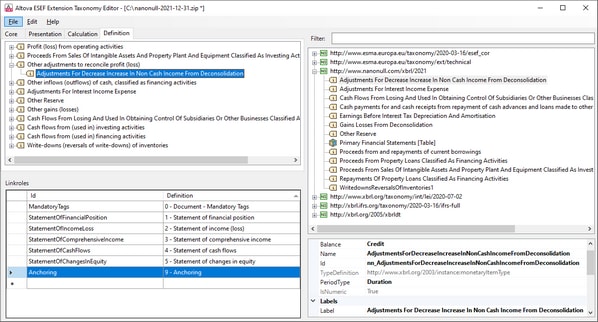
The ESEF Add-in's Taxonomy Editor (screenshot below) opens in a new window when you click the Taxonomy Editor button in the ESEF ribbon. Taxonomy Editor enables you to edit existing ESEF extension taxonomies and create new extension taxonomies.
To edit a taxonomy in Taxonomy Editor, you would follow these broad steps:
1.Open the taxonomy you want to edit. Alternatively, you can create a new taxonomy based on an existing taxonomy.
2.Edit the taxonomy.
3.Save the taxonomy and close Taxonomy Editor.
This topic describes the work procedure listed above.
Open a taxonomy or create a new taxonomy
After Taxonomy Editor has been opened, you can do one of the following:
•Open an existing extension taxonomy. Do this by selecting the menu command File | Open.
•Create a new extension taxonomy from a base taxonomy. Do this either by selecting the menu command File | New or, if no taxonomy is open, by clicking Select Base Taxonomy. In the dialog that appears in both events, select the entry point you want. (Note: The Filter option in this dialog restricts taxonomies to only those that contain the filter string in their names.)
Note: In Taxonomy Editor, only one taxonomy can be edited at a time. This means that when you open or create a taxonomy, any taxonomy that is already open in Taxonomy Editor will be closed. You should therefore make sure that you save the open taxonomy before opening or creating a new one.
Taxonomy Editor interface
Taxonomy Editor comprises a menu bar and four panes. The menu bar has commands to open and save taxonomies, to exit Taxonomy Editor, to undo and redo editing actions, and to access the ESEF Add-in documentation. The four panes are the following:
Concepts pane (top right)
Lists the concepts of the taxonomy by namespace. In the screenshot above, the namespace of the extension taxonomy is expanded to show the concepts in this namespace, which are essentially concepts that have been added to the ESEF taxonomy. This pane has a Filter field that enables you to restrict the selection of concepts to only those that have the filter string in their names.
You can carry out the following actions in this pane via the context menus of concepts (accessed by right-clicking the concept):
•Create a wider or narrower extension of a base-taxonomy concept. The new concept will be created in the namespace of the extension taxonomy. In the screenshot above, for example, the concepts that have been created for the extension taxonomy are shown in the nanonull.com namespace, which has been expanded to show its contents.
•Add a concept (from the base taxonomy or the extension taxonomy) to the presentation or calculation linkbase. These options are available for individual concepts only if applicable.
•If you select a concept in the Concepts pane, then that concept's details are displayed in the Details pane (at bottom right; see screenshot above). You can edit properties of the concept in the Details pane by clicking in the value field of the respective property.
Core Properties and Linkbases pane (top left)
The core properties of the extension taxonomy include various details such as the target namespaces and the names of related taxonomies. These properties are displayed in a single tab and can be edited there. You can switch the base taxonomy of the open taxonomy by clicking Select Base Taxonomy and then selecting the entry point of the new taxonomy. The languages of the taxonomy's labels are listed in a combo box, and this enables you to easily switch the label language that is used in Taxonomy Editor.
Besides the tab for core properties, there are tabs for each of the taxonomy's linkbases (Presentation, Calculation, Definition; see screenshot above). You can add new relationships to a linkbase by dragging a concept from the Concepts pane to the appropriate linkbase tab and dropping it in the location where you want to create a relationship. You can also move items in a linkbase tab in order to modify relationships or to create new relationships. If you want to remove a relationship, do so via the relationship's context menu.
Additionally, you can do the following in each of these tabs via the context menus of items (accessed by right-clicking the item):
•Create a wider or narrower extension of a base-taxonomy concept. The new concept will be created in the namespace of the extension taxonomy.
•If a concept has more than one label, you can change its preferred label.
•If you select a concept in a linkbase pane, then that concept's details are displayed in the Details pane (at bottom right; see screenshot above). You can edit properties of the concept in the Details pane by clicking in the value field of the respective property.
•Remove a relationship from the linkbase (discussed above).
Linkroles pane (bottom left)
Lists the linkroles of the taxonomy. If you select a linkrole in this pane, then the relationship definitions in which that linkrole is used are listed in the respective linkbase tab/s of the Core Properties and Linkbases pane. If you select the Anchoring item, then the relationship definitions between concepts are displayed in the Core Properties and Linkbases pane (in the Definitions tab) .
Details pane (bottom right)
Displays the core details and labels of the concept that was selected in either the Concepts pane or the Core Properties and Linkbases pane. To edit the value of a concept's property, click in the respective value field.
Save taxonomy and close Taxonomy Editor
To save changes that you make to the taxonomy, select File | Save or File | Save As.
To close Taxonomy Editor, select File | Exit. You will be prompted about whether or not you want to use the edited taxonomy as the taxonomy of an ESEF report. In either case, you will be returned to the ESEF Add-in.
