List Form Layout and Structure
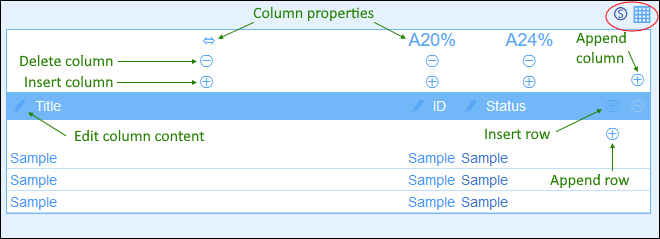
When the form is open for editing, click the Table editing icon (inside the red ellipse in the screenshot below). The table will be displayed with its editing entry helpers (screenshot below). The table in the list form will contain a header row and multiple body rows for the records of the container. The only part of the table that you can edit is the table header. The header structure represents both the header and the record. So, for example, if the header is configured to have two rows, then each record will also have two rows. This means that when you design a list form, you simply design the header. (The block of sample rows in the design is a placeholder: the number of rows in this block does not change; the number of columns, however, does.)

You can edit the form's table structure as follows:
•Insert/append columns to left/right of the selected column, and insert/append rows above/below the selected row. Use the respective icons for these operations (see screenshot above). New columns can be inserted to the left of the selected column, and new rows can be inserted above the selected row. Note that there is only one Append Column icon: to the right of the rightmost column. Similarly, there is only one Append Row icon: below the last row.
•Delete rows/columns by using the respective icons.
•Edit the content in a column by using that column's Edit icon/s. You can add one of several components to a column. See List Form Content for details.
•When you add a row (to the header), the two-row (or x-row) structure will be applied not only to the header but to every record.
| Note: | After you complete making changes to the table structure and want to exit the table editing mode, click the Table editing icon. |
Column properties
You can set the following layout properties on individual columns:
•Column width options: (i) Default column width, where all columns are equally sized; (ii) Fixed width as percent; (iii) Auto-size the column width based on content, with an optional maximum width. Auto-sized columns are indicated by an A (see screenshot above). For columns with fixed widths as percent, and for auto-sized columns with a maximum percent width, the percent width is indicated in the column header (see screenshot above).
•Column padding (left and right): Set these with the respective sliders.