Using Google Cloud SQL
Google recently announced their next generation of managed MySQL offerings on Cloud SQL, so we wanted to take it for a spin and create a cloud-based SQL database that we could then utilize as the back-end for mobile apps, or even for advanced data analytics from our desktop.
According to Google, the two principal goals of the second generation of Cloud SQL were better performance and scalability per dollar. It seems that they succeeded in these goals: the second generation Cloud SQL is more than seven times faster than the first. And it scales to 10TB of data, 15,000 IOPS, and 104GB of RAM per instance — well beyond the first generation. So it looks like the ideal, scalable cloud-based database back-end for mobile apps.


It is highly recommended to change your root password and to only allow access to your cloud instance from authorized networks that will host your developer machines, or your back-end servers for the mobile app that you are building. For example, in a future blog post we will explore building a mobile app on top of this database, and the MobileTogether back-end server that will provide all the server functionality and workflow for our mobile app will need to be able to access this Cloud SQL instance.
In order to use the Cloud SQL instance from your desktop developer machine, you will need to download the MySQL tools for your machine, which will enable you to use the mysql command-line tool. Also, to use the Cloud SQL database from other applications on your computer, you will need to download the respective MySQL Connectors. In this blog post we'll be using Altova DatabaseSpy to access the SQL instance, upload some data, and then perform some analysis, so you'll want to download the MySQL Connector/ODBC for Windows. Essentially, DatabaseSpy is similar to Toad, but allows you to connect to multiple different database instances on different database servers at the same time. So you can have one connection open to Cloud SQL, one connection to a local SQL Server, and a third connection to an Oracle Database - all from within one workspace. Pretty nifty.
One important note: you'll want to make sure that you download the right Connector/ODBC driver. If you're using the 64-bit version of DatabaseSpy, you'll also need the 64-bit version of the MySQL Connector/ODBC driver. Or, better yet, you can download both the 32-bit and 64-bit versions of Connector/ODBC and install them both - then you can use Cloud SQL from both 32-bit and 64-bit software on your machine.
To populate our Cloud SQL instance with some useful data for experimentation and further analysis, we downloaded the excellent Lahman's Baseball Database, which is conveniently available as a zipped MySQL dump. After downloading this onto our computer, we had a complete SQL database table descriptions plus all the data - all in one SQL file, so it can be easily uploaded into our Cloud SQL instance.
The first step is to create a new database in your Cloud SQL instance. You can do that either via the command-line mysql utility, via the Google Developer Console, or via cURL - see link at the beginning of this paragraph for more details. We will simply call this database "lahman".
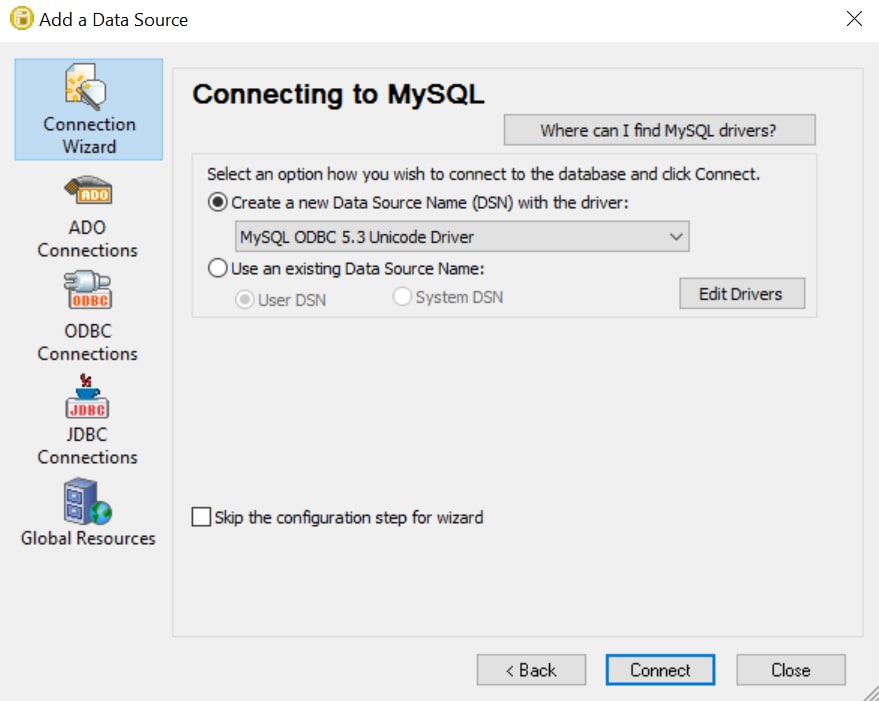
Now we can connect to this database from DatabaseSpy by choosing the "Connect to a database" command and following these steps through the connection wizard. First we select MySQL as the database technology:

Then we confirm the use of the MySQL Connector/ODBC driver that we have downloaded previously:

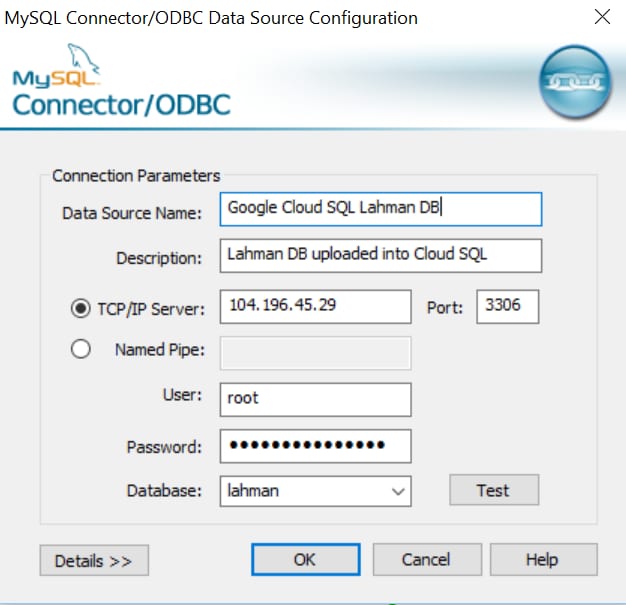
And last, but not least, we specify the IP address, username, and password of our Cloud SQL instance, then hit the "Test" button to verify the connection. If that works, we can now create a data source by giving it a name, and also specify the "lahman" database that we previously created:

Now we're ready to upload all the data into tables in our new database. To do that, we simply open the SQL dump of the Lahman Baseball Database that we previously downloaded and unpacked, which looks like this in DatabaseSpy:

As you can see, the SQL dump of that database contains all the necessary commands to recreate all the tables on our new Cloud SQL instance. So all we have to do now is hit the "Execute" button and sit back. Depending on your Internet connection speed, this may take a little while, as you're now creating 24 tables with highly detailed baseball statistics from 1871 until 2014 - some of which have over 160,000 rows. In my case it took about 8 minutes to complete.
Now you can hit "Refresh" in your Online Database Browser in DatabaseSpy and then explore all the tables and the data contained therein, and the structure of the Lahman database. And you can use this database to calculate interesting historical data, do statistical analysis, and apply other tools often used in Sabermetrics to better understand the quality of players.
As an example, we will look at David Ortiz's percentage of homeruns (HR) hit for every at-bat (AB) over his entire career and will plot that as a function of his age. You will find a player's at-bat performance in the "Batting" table and his name, birth date, etc., in the "Master" table. Joining the two tables in SQL and selecting the data for David Ortiz is easy, and we can then calculate his Career HR Trajectory simply as HR/AB and plot that against his age in a given year:
SELECT yearID-birthYear AS Age, HR/AB AS CareerHRTrajectory FROM Batting, `Master`
WHERE Batting.playerID = `Master`.playerID AND nameLast='Ortiz' AND nameFirst='David'
ORDER BY Age ASC
Once you hit "Execute", this query is sent to the Cloud SQL instance and the resulting data is returned almost instantaneously as a table. You can then hit the "Graph" button in the result table view to graph the data and plot the Career HR Trajectory over his age:

As you can see, it is very easy to connect to and utilize the new Google Cloud SQL instances from Altova DatabaseSpy or, for that matter, from any of the other Altova developer tools, including XMLSpy, MapForce, MobileTogether, StyleVision, and UModel. In addition, you can easily utilize Cloud SQL instances from MapForce server for data integration and conversion projects.
In a future blog post we will connect to this Cloud SQL instance from a mobile app and explore how easy it is to build a convenient mobile app front-end on top of the Lahman baseball database.