Example: Using File Names as Mapping Parameters
This example walks you through the steps required to execute a mapping that takes input parameters at runtime. The mapping design file used in this example is available at the following path: <Documents>\Altova\MapForce2024\MapForceExamples\FileNamesAsParameters.mfd.
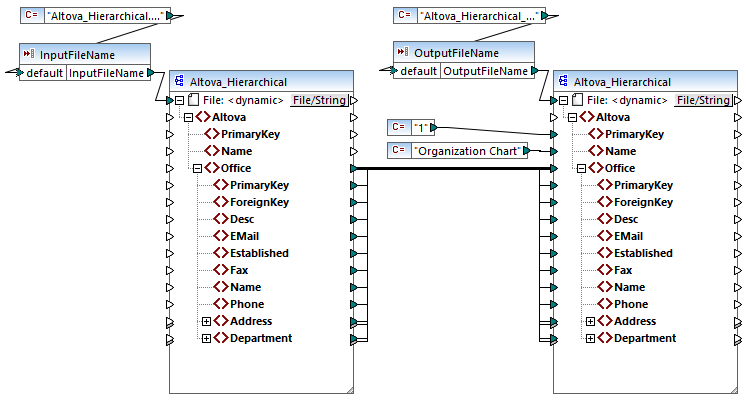
This mapping reads data from a source XML file and writes it to a target XML file. The data is written to the target file almost unchanged; only the attributes PrimaryKey and Name are populated with some constant values from the mapping. The main goal of the mapping is to enable the caller to specify the name of the input file and the name of the output file, as mapping parameters, at mapping runtime.
To achieve this, the mapping has two input components: InputFileName and OutputFileName. These supply the input file name (and the output file name, respectively) of the source and target XML file. For this reason, they are connected to the File: <dynamic> item. You can switch a component to this mode by clicking the File (  ) button, and selecting Use Dynamic File Names Supplied by Mapping.

FileNamesAsParameters.mfd (MapForce Enterprise Edition)
If you double-click the title bar of either of the InputFileName and OutputFileName components, you can view or edit their properties. For example, you can specify the data type of the input parameter or change the input parameter name, as described in Simple Input Component Settings. In this example, the input and output parameters are configured as follows:
•The InputFileName parameter is of type "string" and it has a default value supplied by a constant defined in the same mapping. The constant is of type "string" and its value is "Altova_Hierarchical.xml". Therefore, when this mapping runs, it will attempt to read data from a file called "Altova_Hierarchical.xml", assuming that you do not supply some other value as parameter.
•The OutputFileName parameter is of type "string" and it also has a default value supplied by a constant defined in the same mapping. The constant is of type "string" and its value is "Altova_Hierarchical_output.xml". Therefore, the mapping will create an XML output file called "Altova_Hierarchical_output.xml" when it runs, assuming that you do not supply some other value as parameter.
The following sections illustrate how to run the mapping and supply parameters in the following transformation languages:
•XSLT 2.0, using RaptorXML Server
XSLT 2.0
If you generate code in XSLT 1.0, XSLT 2.0, or XSLT 3.0, a DoTransform.bat batch file is generated in the chosen target directory, in addition to the XSLT file. The DoTransform.bat lets you execute the mapping with RaptorXML Server, see Automation with RaptorXML Server.
To use a different input (or output) file, edit the DoTransform.bat file to include the required parameters, as follows:
1.First, generate the XSLT code. For example, to generate XSLT 2.0, select the menu command File | Generate Code In | XSLT 2.0.
2.Copy the Altova_Hierarchical.xml file from <Documents>\Altova\MapForce2024\MapForceExamples\ to the directory where you generated the XSLT 2.0 code (in this example, c:\codegen\examples\xslt2 ). As stated previously, the mapping will attempt to read this file if you do not supply a custom value to the InputFileName parameter.
3.Edit DoTransform.bat to include the custom input parameter either before or after %*. Note that the parameter value is enclosed with single quotes. The available input parameters are listed in the rem (Remark) section. Let's suppose that you would like to generate an output file called output.xml. To achieve this, change the DoTransform.bat file as follows:
@echo off
RaptorXML xslt --xslt-version=2 rem --param=InputFileName: rem --param=OutputFileName: IF ERRORLEVEL 1 EXIT/B %ERRORLEVEL% |
When you run the DoTransform.bat file, RaptorXML Server completes the transformation using Altova_Hierarchical.xml as input. If you followed the steps above, the name of the generated output file will be output.xml.
