Create a Report
The instructions below show you how to prepare a new XBRL report based on the EIOPA XBRL taxonomy available in EIOPA (Solvency II) XBRL Add-in. This XBRL taxonomy is installed by default on your computer when you install the add-in. Additional taxonomies can be installed separately. For details, see XBRL Taxonomy Manager.
New report
To create a new report, take the following steps:
1.Click the add-in tab in the Excel ribbon.
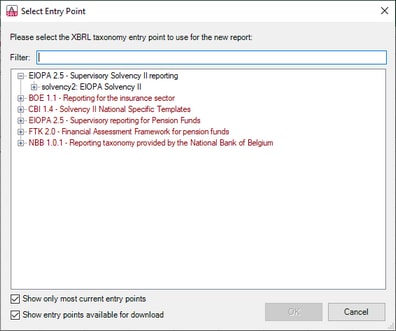
2.Click Insert New Report. This will open the Select Entry Point dialog.
3.Select the taxonomy entry point corresponding to the report you want to create (see screenshot below). Use the filter at the top of the dialog box to filter entry points by keywords. By default, only the most current entry points for the current version of the add-in are shown. To show all the XBRL taxonomies available for download, select the check box Show entry points available for download. To show all versions, clear this check box. Entry points shown in red are not installed. To install the respective XBRL taxonomies, select the entry point and click OK. This opens the XBRL Taxonomy Manager where you can complete the installation. For more information, see XBRL Taxonomy Manager. Because of memory requirements, some entry points cannot be loaded in the 32-bit version of the add-in, in which case they appear as grayed out in the dialog box. To make the loading of such entry points possible, use Excel 64-bit and install the 64-bit version of the add-in.
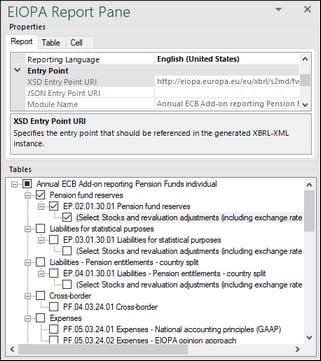
4.At the next stage, the report tables are loaded into Excel. During this operation, a dialog box informs you about the progress. Once the report tables have finished loading, notice the Tables section in the EIOPA Report Pane (see below).
5.Select the check boxes next to the tables you want to include in the report. Each included table appears on a new sheet in the Excel book. Please note that tables checked for inclusion will generate a true filing indicator, and tables that are left unchecked will generate a false filing indicator. You can set filing indicators by checking/unchecking the relevant table in the Tables section of the pane. Each table that has been checked will be added to the report and set as filed; all the others will not be added to the report.
You can now start entering data in tables, validate it, and export it to XBRL format. See the following topics for more information:
•Enter Data
•Control Accuracy of Cells
•Validate Data
•Export Data to XBRL
Update entry point (Enterprise Edition)
If you have already created a report and wish to switch to a different version (newer or older, if necessary) of the same taxonomy, you can do this by means of the Update Entrypoint ribbon command. Clicking this command opens the Select Entry Point dialog (see subsection above), in which you can select and install a different version of the same taxonomy. The currently used taxonomy version is grayed-out in the Select Entry Point dialog.
When you select a different taxonomy version you want to install, this taxonomy version will open in a new workbook. Importantly, the facts from the original workbook that fully correspond to the concepts in the new entry point will be copied to the new workbook. If, for some reasons, the facts are not available in the new entry point (e.g., the data types do not match in the original and newly installed entry points), you can copy these facts manually from the original workbook. Preserving the original workbook helps prevent data loss.
All the facts that cannot be inserted into the newly installed entry point will be shown in the Validation Report. This information will appear simultaneously in the validation reports of the original and newly installed entry points. The validation report will contain links to the facts that cannot be imported into the new report. Clicking these links will highlight the corresponding cells in the original report.

