Options
You can set options for network access and network proxy settings. To open the Options dialog, click the Options button at the bottom left of the Taxonomy Manager GUI. Go to the section you want (see descriptions below) and set your options. After finishing, click OK to apply the settings.
Network
The Network section (screenshot below) enables you to configure important network settings.
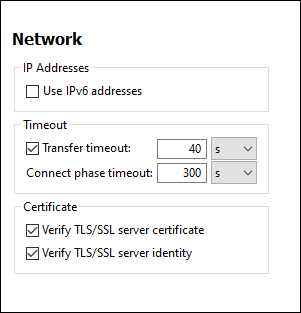
IP addresses
When host names resolve to more than one address in mixed IPv4/IPv6 networks, selecting this option causes the IPv6 addresses to be used. If the option is not selected in such environments and IPv4 addresses are available, then IPv4 addresses are used.
Timeout
•Transfer timeout: If this limit is reached for the transfer of any two consecutive data packages of a transfer (sent or received), then the entire transfer is aborted. Values can be specified in seconds [s] or milliseconds [ms], with the default being 40 seconds. If the option is not selected, then there is no time limit for aborting a transfer.
•Connection phase timeout: This is the time limit within which the connection has to be established, including the time taken for security handshakes. Values can be specified in seconds [s] or milliseconds [ms], with the default being 300 seconds. This timeout cannot be disabled.
Certificate
•Verify TLS/SSL server certificate: If selected, then the authenticity of the server's certificate is checked by verifying the chain of digital signatures until a trusted root certificate is reached. This option is enabled by default. If this option is not selected, then the communication is insecure, and attacks (for example, a man-in-the-middle attack) would not be detected. Note that this option does not verify that the certificate is actually for the server that is communicated with. To enable full security, both the certificate and the identity must be checked (see next option).
•Verify TLS/SSL server identity: If selected, then the server's certificate is verified to belong to the server we intend to communicate with. This is done by checking that the server name in the URL is the same as the name in the certificate. This option is enabled by default. If this option is not selected, then the server's identify is not checked. Note that this option does not enable verification of the server's certificate. To enable full security, both the certificate as well as the identity must be checked (see previous option).
Network Proxy
The Network Proxy section enables you to configure custom proxy settings. These settings affect how the application connects to the Internet (for XML validation purposes, for example). By default, the application uses the system's proxy settings, so you should not need to change the proxy settings in most cases. If necessary, however, you can set an alternative network proxy by selecting, in the Proxy Configuration combo box, either Automatic or Manual to configure the settings accordingly.
Note: The network proxy settings are shared among all Altova MissionKit applications. So, if you change the settings in one application, all MissionKit applications will be affected.
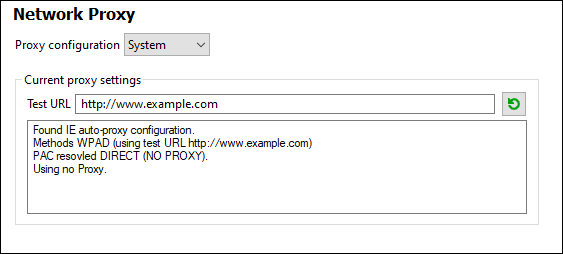
Use system proxy settings
Uses the Internet Explorer (IE) settings configurable via the system proxy settings. It also queries the settings configured with netsh.exe winhttp.
Automatic proxy configuration
The following options are provided:
•Auto-detect settings: Looks up a WPAD script (http://wpad.LOCALDOMAIN/wpad.dat) via DHCP or DNS, and uses this script for proxy setup.
•Script URL: Specify an HTTP URL to a proxy-auto-configuration (.pac) script that is to be used for proxy setup.
•Reload: Resets and reloads the current auto-proxy-configuration. This action requires Windows 8 or newer, and may need up to 30s to take effect.
Manual proxy configuration
Manually specify the fully qualified host name and port for the proxies of the respective protocols. A supported scheme may be included in the host name (for example: http://hostname). It is not required that the scheme is the same as the respective protocol if the proxy supports the scheme.
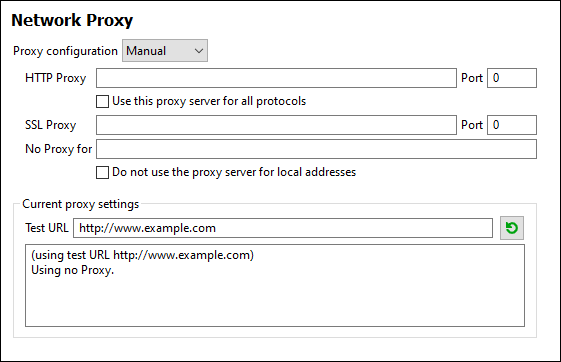
The following options are provided:
•HTTP Proxy: Uses the specified host name and port for the HTTP protocol. If Use this proxy server for all protocols is selected, then the specified HTTP proxy is used for all protocols.
•SSL Proxy: Uses the specified host name and port for the SSL protocol.
•No Proxy for: A semi-colon (;) separated list of fully qualified host names, domain names, or IP addresses for hosts that should be used without a proxy. IP addresses may not be truncated and IPv6 addresses have to be enclosed by square brackets (for example: [2606:2800:220:1:248:1893:25c8:1946]). Domain names must start with a leading dot (for example: .example.com).
•Do not use the proxy server for local addresses: If checked, adds <local> to the No Proxy for list. If this option is selected, then the following will not use the proxy: (i) 127.0.0.1, (ii) [::1], (iii) all host names not containing a dot character (.).
Current proxy settings
Provides a verbose log of the proxy detection. It can be refreshed with the Refresh button to the right of the Test URL field (for example, when changing the test URL, or when the proxy settings have been changed).
•Test URL: A test URL can be used to see which proxy is used for that specific URL. No I/O is done with this URL. This field must not be empty if proxy-auto-configuration is used (either through Use system proxy settings or Authomatic proxy configuration).