Java Interface
The API consists of a JAR file (MapForceServer.jar) and a JNI file (MapForceServer.dll). Both these files, as well as other related API files, are available in the bin folder of the MapForce Server installation folder. You can either reference these files from their original location or copy them to another location if this fits your project setup. (On Windows systems, you will need administrative rights to run the program from its original location.)
Note: If you have installed a 64-bit MapForce Server, then the 32-bit version files of MapForceServer.jar and (MapForceServer.dll will be located in the bin\API_32bit folder of the MapForce Server installation folder. You would need these files if you are using a 32-bit Java version. Similarly, if you have installed a 32-bit MapForce Server, then the 64-bit version files of MapForceServer.jar and (MapForceServer.dll will be located in the bin\API_64bit folder. You would need to use these files if you are using a 64-bit Java version.
To access the MapForce Server API from Java code, add the following references to the .classpath file of your Java project.
MapForceServer.jar The library that communicates with MapForce Server
MapForceServer_JavaDoc.zip Documentation of the MapForce Server API
Additionally, the java.library.path needs to include the folder where the JNI library file (MapForceServer.dll) is located.
If you deploy your project to an application server, make sure that MapForceServer.jar and MapForceServer.dll are correctly configured with Java on the server machine.
For an example of how to use the API's library files, see the example batch file buildAndRun.bat (listed below), which is located in the etc\Examples\Java folder of your MapForce Server installation folder.
Build and run a Java program to use the API
To see how you can build and run a Java program that uses the MapForce Server API, see the example batch file buildAndRun.bat. You can re-use this file to run your own Java programs by modifying it as required.
Start the batch file in a command line interface with the following command:
buildAndRun "path_to_Java_bin_folder"
Note: To check whether Java is in your classpath, you can run the command java --version. If Java is not in your classpath, then you must provide the path to it as a parameter of the buildAndRun command. If the path contains spaces, then uses quotes around teh path.
@echo off if %1.==. goto error
REM The location of the JAVA API binaries, the JAR file and the JNI library. REM Adapt to your needs. SETLOCAL Set JavaAPIBinPath=%PROGRAMFILES%\Altova\MapForceServer2026\bin
REM Compile sample java REM The -cp option (classpath) needs to point to the installed jar file (here, in its original location) REM "Program.java" is the Java program you want to compile %1\javac.exe -cp "%JavaAPIBinPath%\MapForceServer.jar" Program.java
REM Run sample java REM The -cp option (classpath) needs to point to the MapForceServer.jar file REM The java.library.path needs to include the folder where the JNI library MapForceServer.dll is located. %1\java.exe -cp "%JavaAPIBinPath%\MapForceServer.jar;." -Djava.library.path="%JavaAPIBinPath%" Program
@echo off goto end
:error echo Usage: buildAndRun "<path_to_java_bin_folder>"
:end |
Adding library references in Eclipse
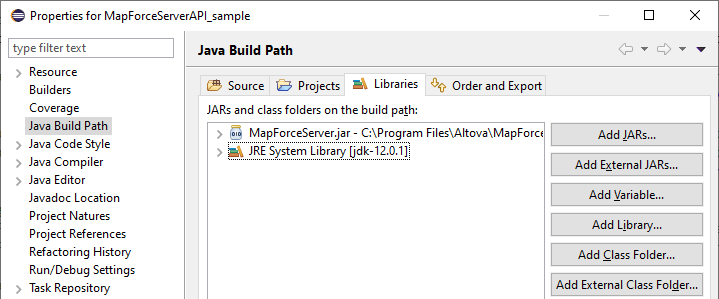
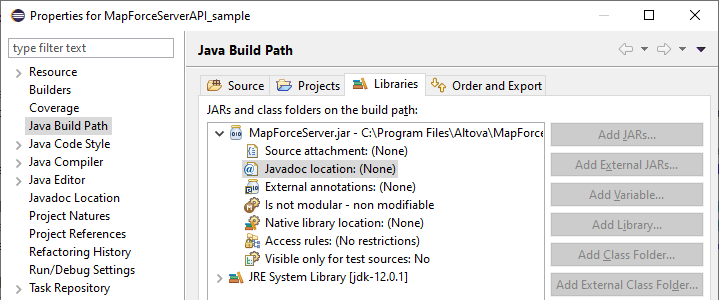
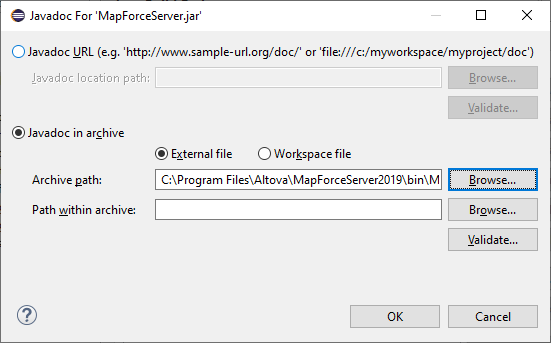
If you are using Eclipse as Java development environment, you can add the required library reference to the CLASSPATH by editing the properties of the Java project, as shown below. Optionally, you can also attach documentation in JavaDoc format to the .jar library. You can find the JavaDoc in the bin folder of the MapForce Server installation folder; the instructions below illustrate how to make the JavaDoc documentation visible from Eclipse.
1.With the project open in Eclipse, on the Project menu, click Properties.
2.Click Java Build Path.
3.On the Libraries tab, click Add External JARs, and then browse for the MapForceServer.jar file located in the MapForce Server installation folder.

4.Optionally, to add the JavaDoc archive, expand the MapForceServer.jar record, and then double-click the Javadoc location: (None) record.

5.Ensure that the Javadoc in archive and External file options are selected, and then browse for the MapForceServer_JavaDoc.zip file located in the MapForce Server installation folder.

6.Click OK.
Below is an example of how the Eclipse .classpath file might look if you are referencing the files from the original installation folder, on a 64-bit Windows running 64-bit MapForce Server (the relevant lines are highlighted in yellow):
<?xml version="1.0" encoding="UTF-8"?> |