XML in the Cloud
Working with Altova Tools and the Amazon Relational Database Service (Amazon RDS)
More and more enterprises are discovering the advantages of implementing database applications in the cloud:
- High availability and reliability
- Automatic scaling
- Freedom from hardware costs and maintenance requirements
In this blog post we demonstrate how to connect to the Amazon Relational Database Service (Amazon RDS) and build a small database using Altova DatabaseSpy. Since the database Connection Wizard is consistent across the Altova MissionKit, you can connect the same way using XMLSpy, MapForce, or StyleVision. If you would like to follow the steps described below for yourself, you will need to sign up for an Amazon Web Services (AWS) account at: http://aws.amazon.com/rds/ You can also download a fully-functional free trial of the Altova MissionKit or any individual Altova application at: https://www.altova.com/download-trial/
Build a Local Prototype
The Amazon RDS is based on MySQL, so we will build a small local database in the MySQL Community Edition, then migrate to the Amazon RDS and test our database in the cloud. Although MySQL does not support XML as a data type for database columns, MySQL 5.1 and 6.0 do support some operations for XML data stored as text. For this exercise we will adapt and extend some of the MySQL XML examples at the MySQL reference resources listed here: http://dev.mysql.com/doc/refman/5.1/en/xml-functions.html http://dev.mysql.com/tech-resources/articles/xml-in-mysql5.1-6.0.html http://dev.mysql.com/tech-resources/articles/mysql-5.1-xml.html First, we launched DatabaseSpy and connected to our local MySQL Community Edition. We created a new data source named LocalPrototype, and created a new database schema that we named XMLtest. The DatabaseSpy Online Browser and Properties windows are shown here: 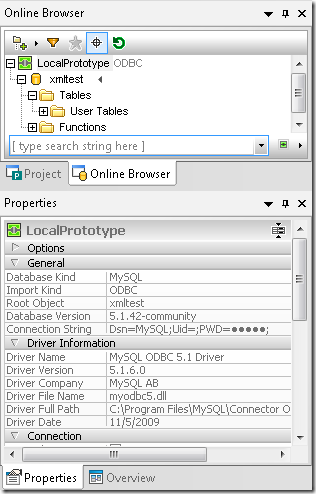 Next, we created two tables called books and cities and inserted data by following the examples in the MySQL documentation. Here is a DatabaseSpy Design View of our tables:
 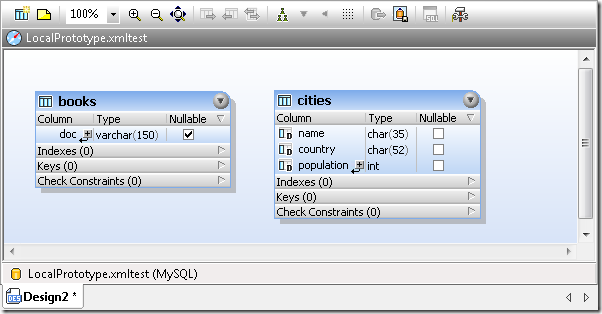 We can run select queries and display the contents of our tables in stacked results windows:
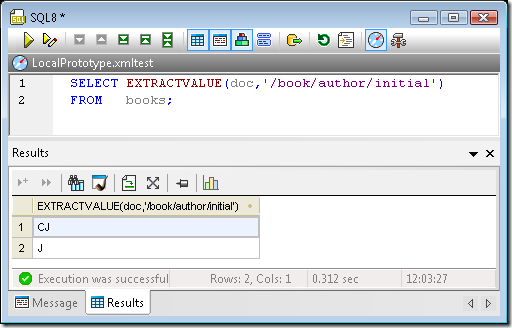
 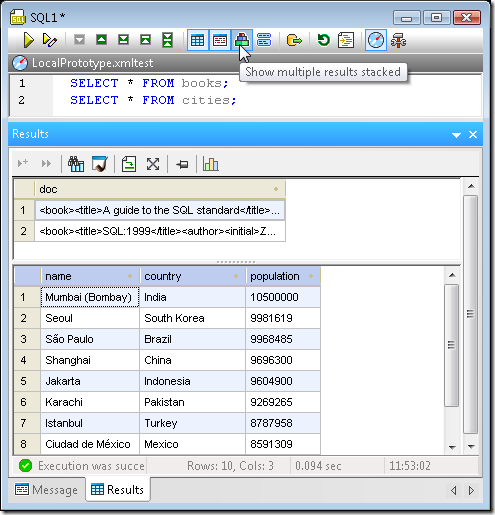 Note that the doc column of the books table contains XML data, although it was defined as varchar(150). MySQL supports two functions for working with XML in text fields, ExtractValue() and UpdateXML() that can operate on individual elements via XPath expressions. Below is a simple ExtractValue() query to return only the author initials from every row in the books table:
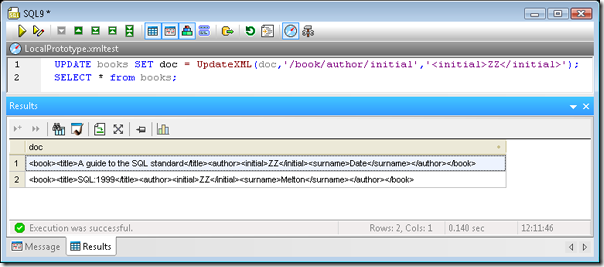
  The UpdateXML() function can be used to modify the contents of individual XML elements using a SQL expression. In the screen shot below, the query on line 1 updates the every row of our books table, and the query on line 2 returns the new values:
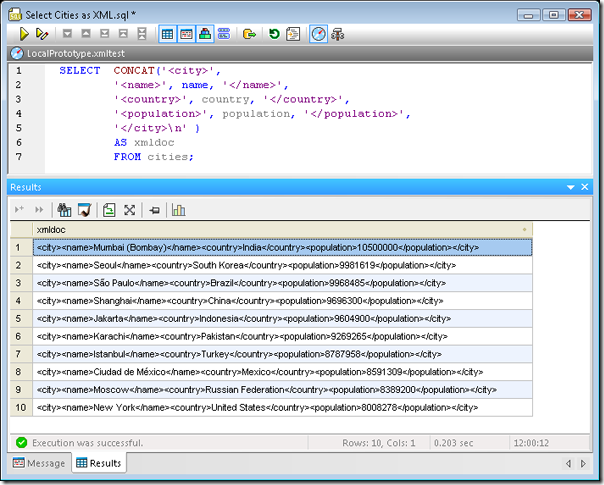
  We can also use the Concat( ) function to add XML elements to non-XML data such as the cities table, as shown below:
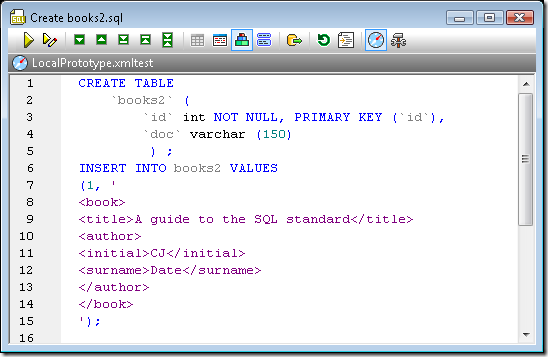
  So far, our XML queries have operated on all rows of each table. To facilitate queries for a single row, it’s handy to add a column top the table to hold a unique row index. We can make a copy of our books table and add a column called id to hold the row index. The id column also makes a convenient foreign key to reference an individual XML document in our table from a row in another table. For instance, you might define one table to contain names of job candidates, with a foreign key to reference the XML-formatted resume for each candidate, stored in a separate table. You can use the SQL Editor in DatabaseSpy to generate a CREATE statement for the existing books table and edit it directly, or you can use the DatabaseSpy Design Editor to build the table graphically. (For more information, see the DatabaseSpy section of the Altova Web site.) Since we are planning to run the same queries later in the Amazon RDS, we combined a SQL CREATE statement and SQL INSERT statements into one script for the books2 table. The screen shot below shows part of the script for books2:
  We can run a query of the books2 table that shows the unique id column for each row:
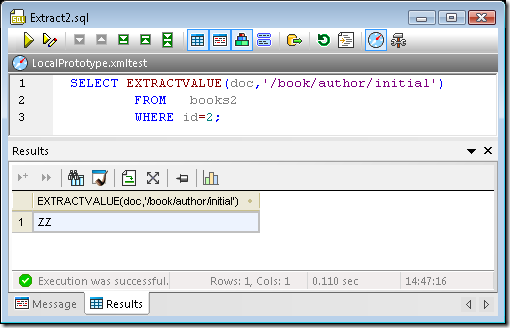
  Now we can enhance our UpdateXML() and ExtractValue() queries to act on an individual row:
 This gives us a good baseline set of examples to take to the cloud and test in an Amazon RDS.
Connect DatabaseSpy to the Amazon RDS Cloud
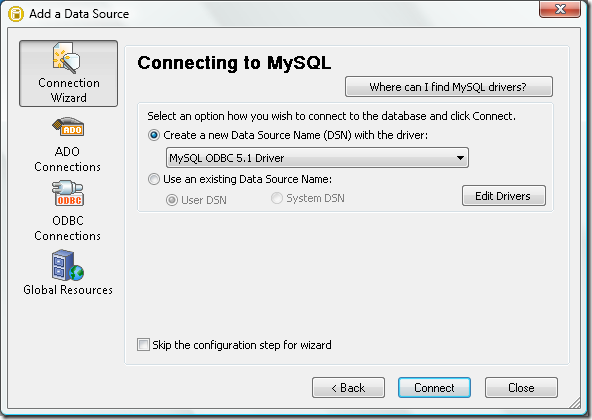
After you follow the instructions at the AWS Management Console to create a database instance on Amazon RDS, the Connection Wizard makes it easy to get started with DatabaseSpy. Simply choose the MySQL option as shown here: 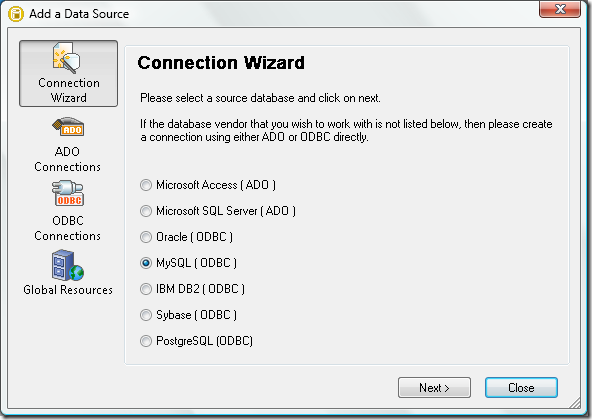 The first time you connect, you will need to create a new DSN. After the first time, you will be able to select the DSN from a list by choosing the “Use an existing Data Source Name” option. You can even use the original DSN when you go back to connect from XMLSpy, MapForce, or StyleVision.
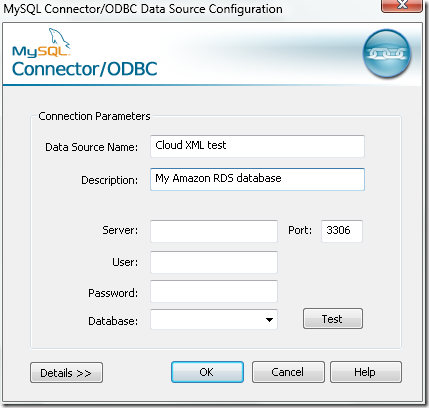
  In the connector dialog, fill in the following information:
- Data Source Name: This is the name that will be listed in the DatabaseSpy Project. window and in the list of existing data sources when you connect again.
- Description: Information for your own reference.
- Server: This is the Endpoint name listed in your Amazon RDS account dashboard.
- Port: 3306 – make sure your IT department isn’t blocking this port with a firewall!
- User / Password: This is a user you set up in Amazon RDS.
- Database: The default database name you configured when launching your RDS instance.
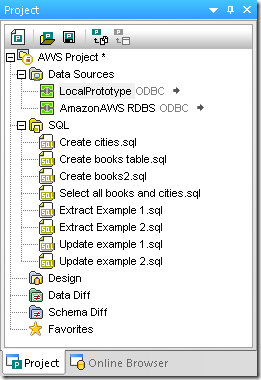
 We connected to our Amazon RDS cloud database in the same DatabaseSpy project we built for the local prototype. Here is a screen shot of the project window showing both Data Source Names and the working SQL files we added to our project:
  Before we build our tables and run the queries, it will be interesting to check the versions of each system. The screen shots below show a query that requests version information for each system. Note that the gray bar directly above each query indicates which data connection the SQKL statement is assigned to.
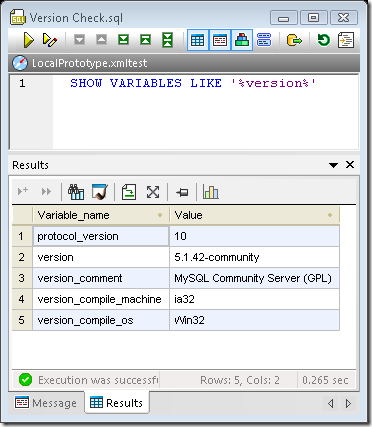
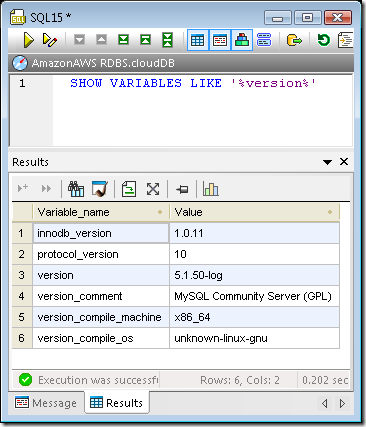 The Amazon RDS reports it is running version 5.1 of the MySQL Community Server, the same as our local prototype – a promising omen!
Migrate the Local Project to the Cloud
We can open each of our original table creation scripts and run them in the cloud database by re-assigning the execution target in the Properties window: 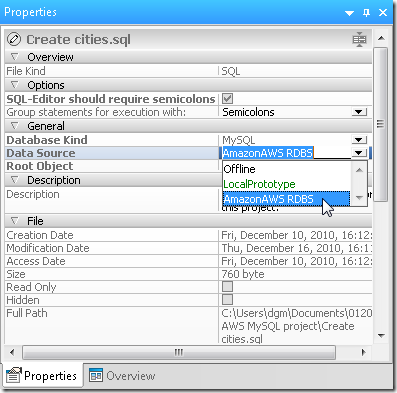 The gray Execution Target bar near the top of the SQL Editor window identifies the cloud Amazon RDS database as the query target:
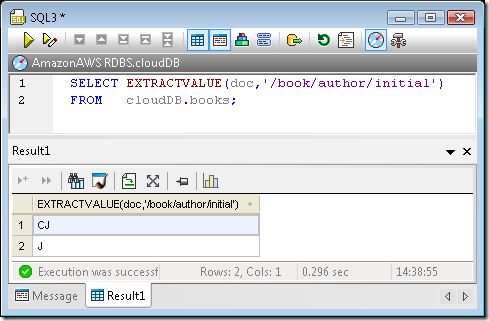
 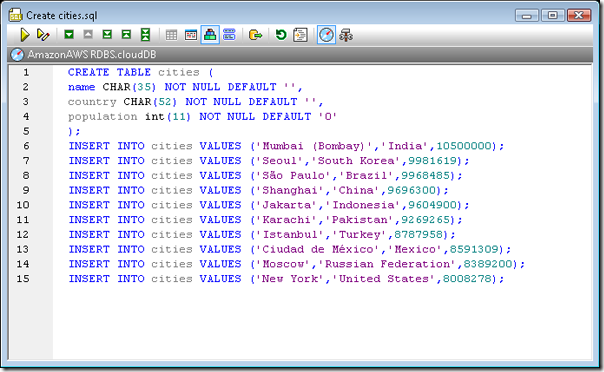 After similarly creating the books and books2 tables, we can run each of the SQL queries in the cloud database. ExtractValue() function for all rows example:
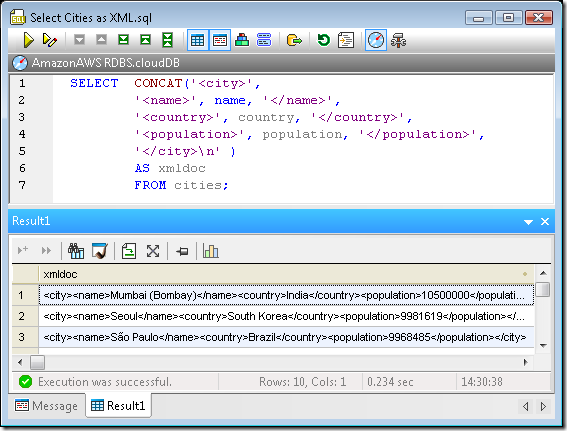
  Concat() query to create XML output from non-XML data in a table:
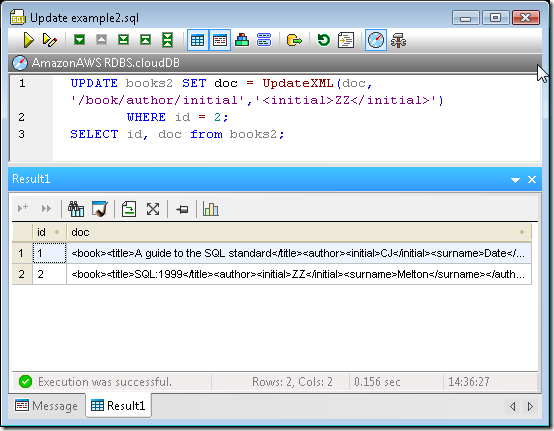
  UpdateXML() example for a single row in a table.
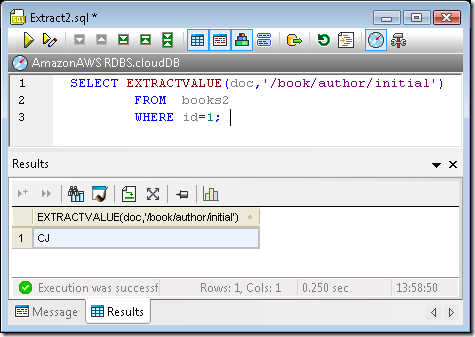
  ExtractValue() for a single row:
Conclusion
In every test we performed, Amazon RDS behaved exactly like the local MySQL community edition. This behavior it much more efficient for developers to build and test new cloud database applications, or enhancements to existing applications, without incurring the cost of cloud resources for development iterations. We also verified the operation of MySQL XML functions for XML data stored in text columns in the cloud databases. Our XML data was very limited – the text column in our books table was limited to 150 characters. However, MySQL lets you store much larger XML documents in a single column. Every table has a maximum row size of 65,535 bytes. Even if your table uses an index column, this means a varchar column for one XML entry could be over 64k bytes. If you need to store even larger XML documents, MySQL offers MediumText and LongText data types, similar to BLOBs. MediumText can hold over 16 million single-byte characters and LongText can hold up to 4 GB. Although not illustrated in this blog post, we have successfully tested ExtractValue() and UpdateXML() functions with MediumText and LongText data types. When you need to store XML data files that large, writing XPath expressions to resolve individual elements can become a development challenge. The XPath Analyzer included with XMLSpy is an invaluable tool that facilitates the testing and debugging of XPath 1.0 and 2.0 expressions. As you type an XPath expression into the analyzer, XMLSpy evaluates it and returns the resulting node set in real time. This can save hours of debugging time spent trying to understand and track down XPath problems. In future blog posts we’ll explore other ways XMLSpy, MapForce, DiffDog, and DatabaseSpy can help developers accelerate creation of cloud application with Amazon RDS. We look forward to seeing you back soon! If you’d like to see for yourself how well Altova tools work with Amazon RDS, download a free trial of the Altova MissionKit.

Here are the SQL scripts discussed above for you to copy and paste:
The CREATE script for the cities table and variations of the CONCAT( ) example came from http://dev.mysql.com/tech-resources/articles/xml-in-mysql5.1-6.0.html
Here is the CONCAT( ) statement as illustrated in the blog post:
SELECT CONCAT('',', name, ' ', ', country, ' ',', population, ' ', n' )
'
'
'
'
AS xmldoc
FROM cities;
The books table examples are based on http://dev.mysql.com/tech-resources/articles/mysql-5.1-xml.html
Here is the CREATE script for the books table:
CREATE TABLE books (doc VARCHAR(150));
A guide to the SQL standard
CJ
Date
SQL:1999
J
Melton
INSERT INTO books VALUES
('
');
INSERT INTO books VALUES
('
');
And the script for books2:
CREATE TABLE
A guide to the SQL standard
CJ
Date
SQL:1999
J
Melton
`books2` (
`id` int NOT NULL, PRIMARY KEY (`id`),
`doc` varchar (150)
) ;
INSERT INTO books2 VALUES
(1, '
');
INSERT INTO books2 VALUES
(2, '
');
Here is the UpdateXML( ) example for books2:
UPDATE books2 SET doc = UpdateXML(doc,'/book/author/initial','ZZ ')
WHERE id = 2;
SELECT id, doc from books2;
And the ExtractValue( ) example:
SELECT EXTRACTVALUE(doc,'/book/author/initial')
FROM books2
WHERE id=1;
Enjoy!