Tag Archive for: Visual Basic

UML Class Diagrams in Altova UModel


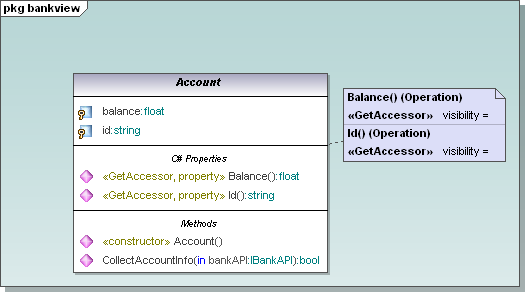
Altova products have long been recognized for their rich, intuitive user interface. One example is the UModel diagram window, which includes multiple display options for class diagrams to facilitate ease of use and improve information clarity in objected-oriented models. Class diagram style for projects that generate .NET (C# and Visual Basic) application code UModel 2011 Release 3 includes a new option for displaying class diagrams for .NET programmers. If your project will generate source code in .NET programming languages (C# or Visual Basic), your classes may contain .NET properties that can be called from outside like attributes, but are implemented internally as methods. To better organize .NET classes, UModel offers an option to display .NET properties and methods in separate operations compartments inside classes. UML class diagram for .NET This view is an optional setting in the Styles helper window for class diagram display and editing. Choosing to display separate .NET properties compartments or a single traditional UML operations compartment has no influence on code generated from the class.
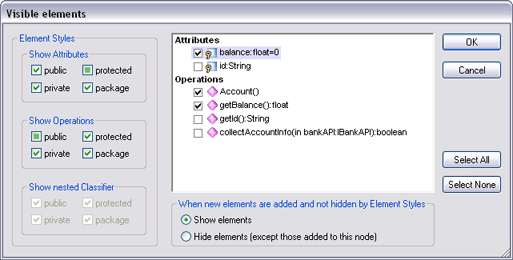
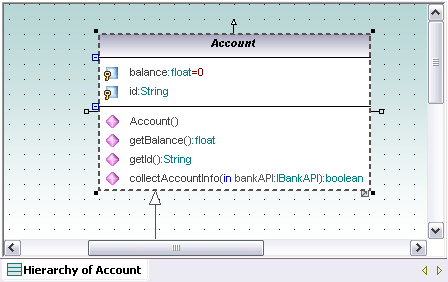
View or Hide Class Properties and Operations Developers can collapse Properties and Operations compartments using convenient grab handle tools along the right edge. They can also customize the display of classes to show or hide individual class properties and operations. The right-click context menu offers a Visible Elements dialog for any selected class. UML class diagram showing properties and operations
Altova UModel visible elements dialog

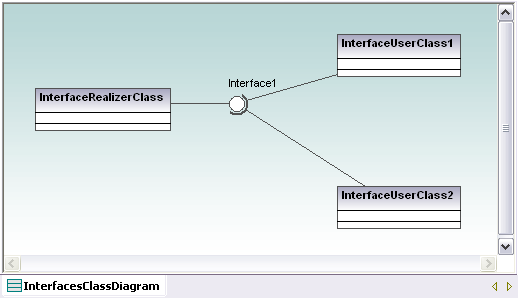
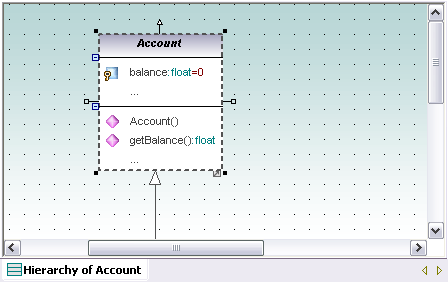
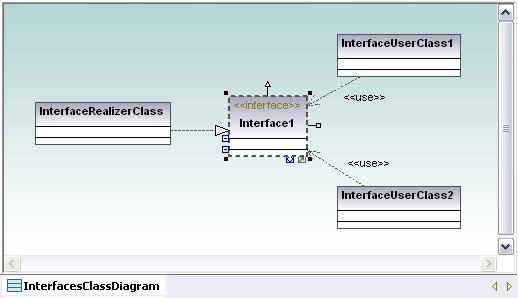
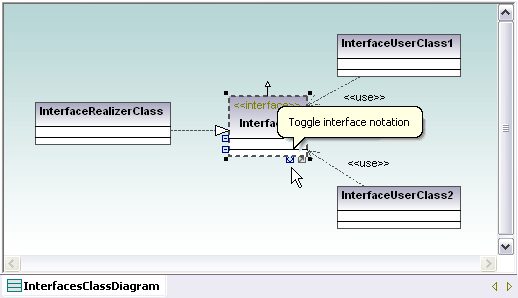
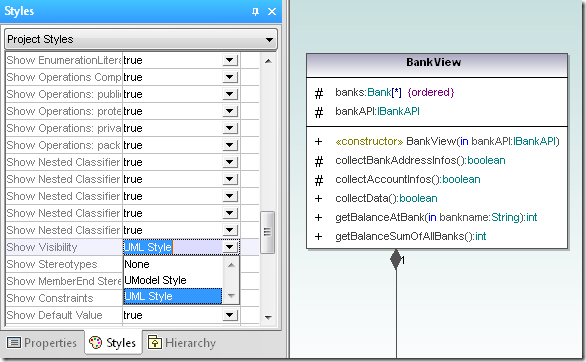
This feature lets users simplify the diagram to focus on the properties and operations relevant to the task at hand. Hidden items are indicated by ellipses. UML class diagram with some properties and operations hidden Clicking on an ellipsis re-opens the Visible elements dialog. Options for Interface Notation UModel 2011 supports alternate diagram styles for interfaces between classes. By default, new interfaces are created in class diagram style with arrowhead styles and notations to indicate the interface creator and interface users. In the class diagram below, the developer wants to concentrate on class relationships and interfaces, so all the properties and operations compartments are collapsed. UML class diagram showing interfaces Interfaces have a special Toggle Notation quick-editing button to switch from the class diagram style to the UML ball and socket interface notation. UML class diagram toggle notation helper UML class diagram with alternate interface notation Visibility Icons vs. Mathematical Operators The UModel visibility icons, along with the visibility pull-down menus in the drawing window and properties menu, have been praised because they avoid confusion with common mathematical operators that can also appear in definitions of properties and operations. But users who prefer the traditional view can choose UML Style in the Project Styles helper window. Altova UModel Styles window and traditional visibility notation All the style settings selected to display class diagrams on screen are also applied when rendering project documentation in Word, RTF, or .html formats Find out for yourself how you can improve development of your object-oriented application by customizing the display of class diagrams with Altova UModel – download a free 30-day trial today!
Tags: , , , , , , ,

Splitting Large UML Sequence Diagrams


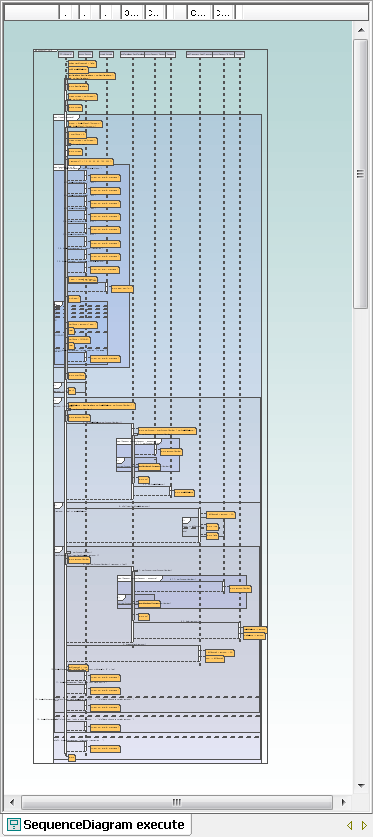
A new feature introduced in UModel 2010 release 2 allows you to split large sequence diagrams when you reverse engineer existing Java, C#, or Visual Basic source code. What are the advantages of splitting a sequence diagram, and how should you decide to split or not? Obviously, a single diagram makes it easy to examine in one view all the interactions that occur during the execution of a class operation. On the other hand, a large, complex diagram can be cumbersome to view, navigate, analyze, and print in a readable format. Fortunately, UModel 2010r2 makes it quick and easy to experiment. After you generate your sequence diagram, if you don’t like the results, just click the Undo button and you can create a new variation by choosing different options in the Sequence Diagram Generation dialog. Or, you can even apply the Generate Sequence Diagram feature more than once to the same class operation, and maintain multiple versions of the sequence diagram in your model. For instance, if you plan to modify the existing code, you might want to keep a permanent record of the “before” and “after” editions to document your changes. We recently adapted our analysis of a bank ATM legacy application to create two new Technical Briefs in the Reference Library section of the Altova Web site, titled Analyze a Legacy Application with Altova UModel and Enhance a Legacy Application with Altova UModel. Enhancement of the code included adding a new method called getFinalOkay directly in the original source code file for the Withdrawal class. When we completed the round trip by synchronizing our UModel project with the application code, the split version of the sequence diagram included a dedicated sub-diagram for the new method. The sub-diagram is automatically labeled with a note and hyperlinked to the main diagram. UML_sequence_diagram If you’re ready to see for yourself how a visual software model can help you work with your own legacy application, click here to download a fully-functional free trial of Altova UModel!
Tags: , , , , , ,

Part 5 – Analyzing a Legacy Application with Altova UModel


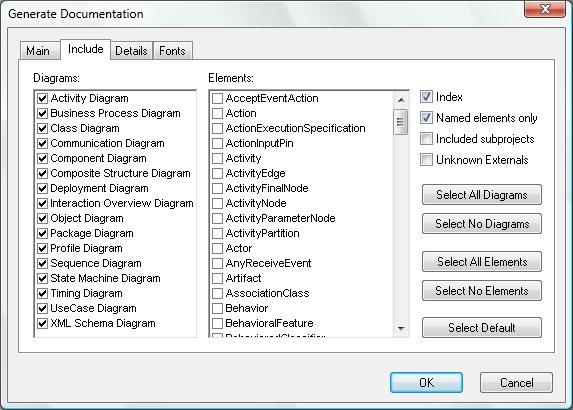
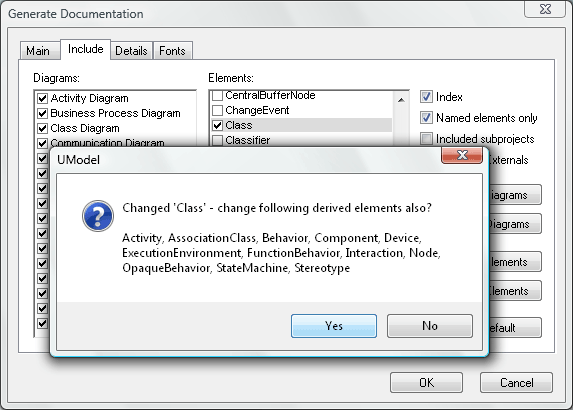
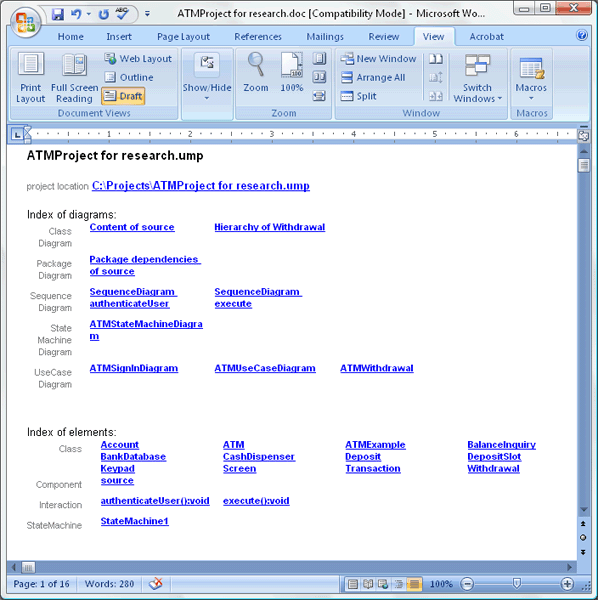
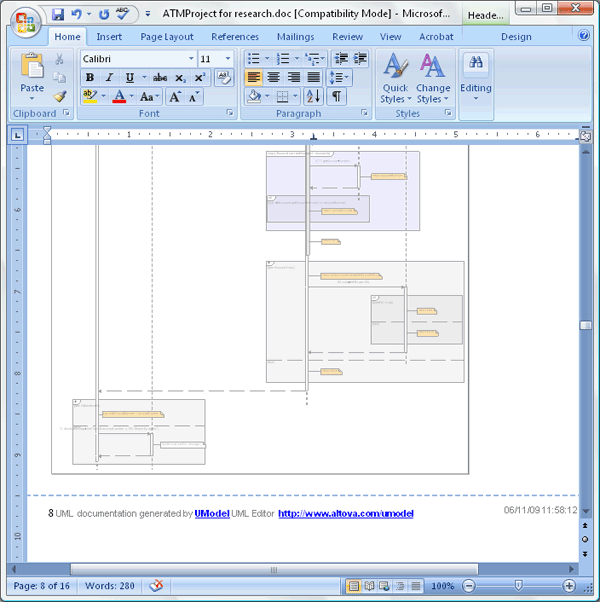
Previously in Part 1, Part 2, Part 3, and Part 4 of this series we applied Altova UModel reverse-engineering functionality to create UML diagrams for an ATM banking simulation application. After analyzing the existing architecture, we planned and implemented a new feature, the withdrawal fee. Even in a reduced size, our updated sequence diagram for the withdrawal transaction clearly represents in graphical form the nested logic structure of the source code. UML sequence diagram (reduced size) This morning we happened to run into the ATM product manager at the coffee machine. “You’ve been working on that ATM code for over a month now,” he said. “When am I going to see what you’ve accomplished?” We can take advantage of the UModel Generate Documentation feature to satisfy this request. UModel will automatically create customized documentation for our project in HTML, Microsoft Word, or RTF formats. The Include tab in the Generate Documentation dialog box lets us choose which diagram types to include, and to specify the level of detail for our report by allowing us to expand each diagram element type. Altova UModel Generate Documentation dialog box For an overview report, we can select all diagram types. We’ll also select class from the Elements list to show further information about the classes in our application. UModel helpfully asks if we want to add elements derived from class as well. Altova UModel Generate Documentation helper After we have selected or adjusted other document parameters, including fonts and sizes, UModel generates the report in just a few seconds. At the top of the first page, the report begins with an index of diagrams and a separate index of elements. Each indexed item is hyperlinked to a bookmark in the document. Altova UModel project documentation in Word format Regardless which format you choose, the resulting report is fully editable. For instance, we can add a footer that includes page numbers and a tag line recording the document creation date. We can grab the tag line UModel created to create our footer. Altova UModel project documentation tag line Our completed report contains all the UML diagrams that describe the legacy ATM application, with detailed class diagrams that show the class properties and operations. Additionally, the illustration of each class is accompanied by a hierarchy diagram to show the class relationships, and a list of all the class associations. Later on as our project evolves further, we can easily generate an updated version of the report. We could even take advantage of the UModel command line functionality or the UModel API to automate creation of project documentation, or we could attach the .html version of the report to our developer team wiki. But for now all we have to do is email the report to the ATM product manager. Conclusion We hope you’ve enjoyed following along with this exercise in Analyzing a Legacy Application with Altova UModel. Although we are ending the series here, in the real world there is much more work to do on our ATM application. For instance, the feature to permit users to accept the fee or cancel a withdrawal remains to be implemented. Or, we could update the legacy code with newer Java language constructs such as generics, annotations, and enumerations. If you’re already experienced with UML we hope we’ve shown you a new trick or two. If you are a developer who’s never tried UML, we wanted to give you some of the flavor and benefits of visual software modeling. Either way, if you’re ready to go further on your own project, click here to download a fully-functional free trial of Altova UModel.

Tags: , , , , , , , , ,

Part 4 – Analyzing a Legacy Application with Altova UModel


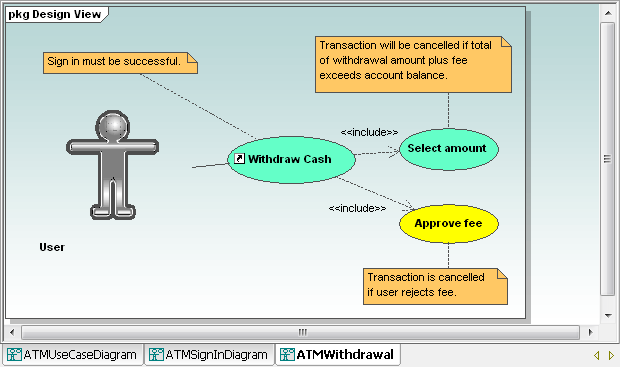
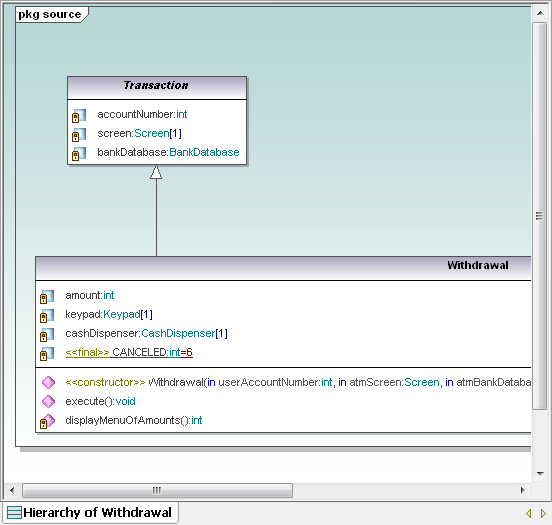
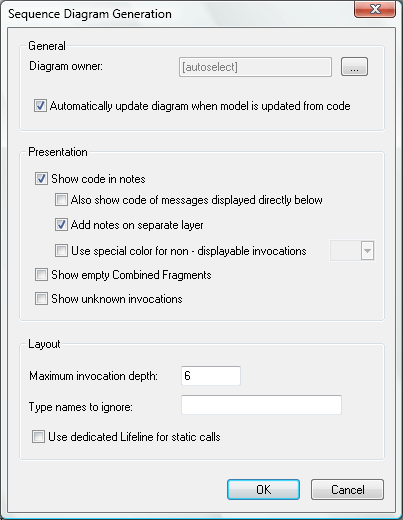
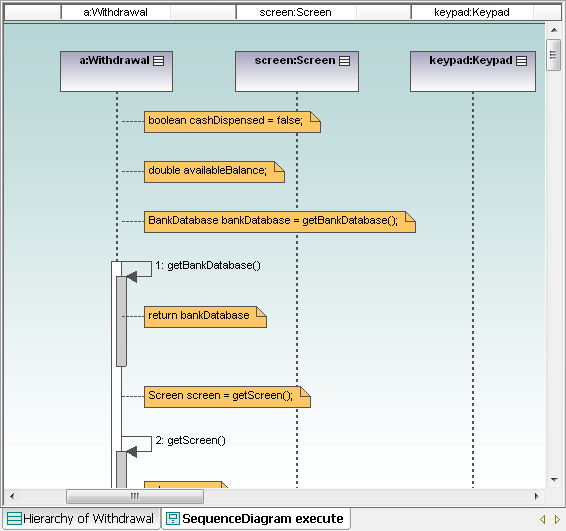
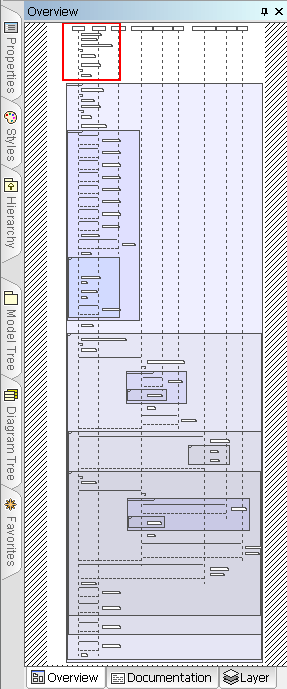
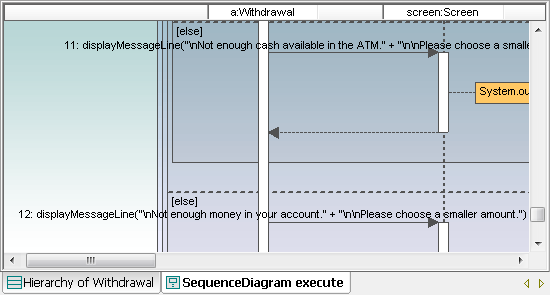
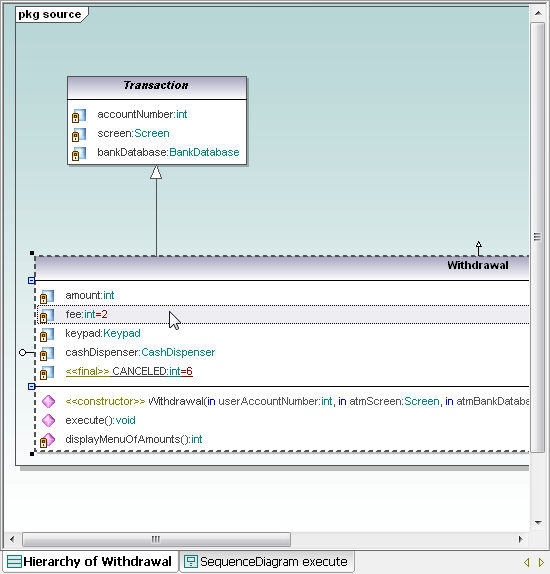
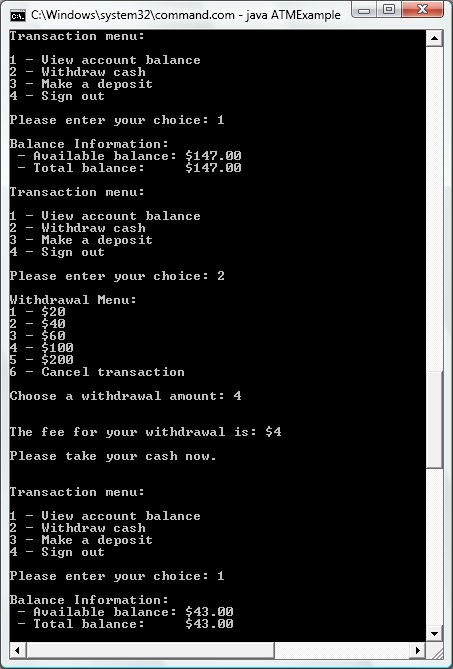
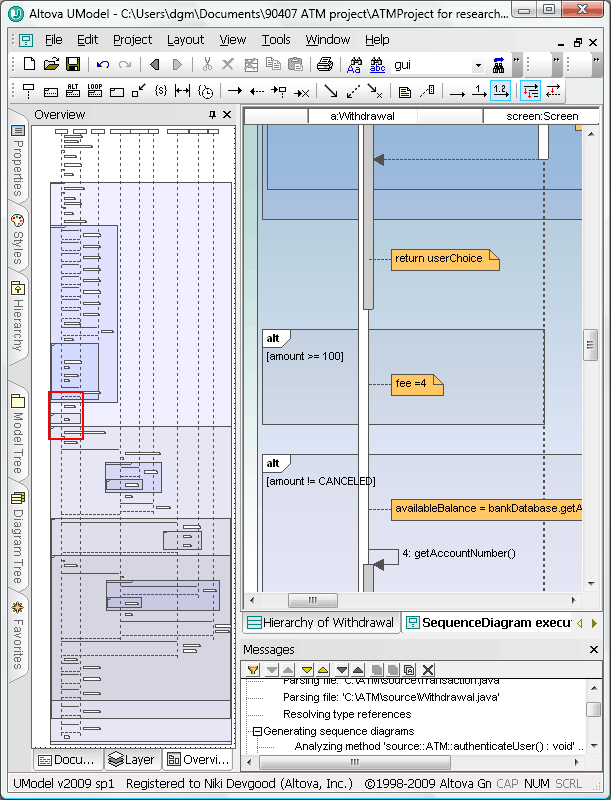
In Part 1 of this series we imported source code into Altova UModel to create a UML project and we examined a class diagram of our legacy ATM application. In Part 2 we created a series of UML use case diagrams to describe user interactions with the system and we planned an application enhancement to implement a withdrawal fee. In Part 3 we designed a UML state machine diagram to further analyze and document the operation of our system. In this installment we will return to our planned enhancement. We’ve been assigned to implement an ATM withdrawal fee of $2 for withdrawals less than $100 and $4 for withdrawals of $100 or more. In Part 2 we drew a use case diagram to show how users will interact with the new feature: UML use case diagram From our original analysis of the object-oriented classes in Part 1, we know our system contains a Withdrawal class, which is the logical place to implement our new feature. We can display a new class diagram for the Withdrawal class by selecting it in the Model Tree and choosing from the right-click context menu to create a new diagram. UModel Model Tree helper window UML class diagram We chose to create a hierarchy diagram so all the properties of the Withdrawal class are visible, including inherited properties from the Transaction class. Before implementing the fee feature, we have a related leftover question to investigate. We wanted to verify that the current code includes a test to make sure a withdrawal amount requested by the user does not exceed the current account balance. A UML sequence diagram will let us trace the execution flow of a withdrawal. UModel can automatically generate sequence diagrams from the operations of reverse-engineered classes. We can select the execute operation in our class diagram and choose Generate Sequence Diagram from the UModel right-click context menu to create the diagram we need. Altova UModel Sequence Diagram Generation dialog The UModel Sequence Diagram Generation dialog offers several options that will assist with our implementation of the new feature. We selected Automatically update because we will want to update the diagram later after we modify the code, and showing the code in a separate layer can help us focus on the withdrawal logic. UML sequence diagram The size of the scroll handles indicates we are only seeing a small portion of the sequence diagram in the current window. We can shrink the view to fit the window, but the text will probably be illegible. Instead, let’s take advantage the flexible UModel user interface to auto-hide the Diagram tree and Properties windows, which allows us to enlarge the Overview helper window: UModel Overview navigation window We can explore the sequence diagram by dragging the red square in the Overview window. This lets us quickly locate the comparison of the withdrawal amount and account balance. UML sequence diagram We can also see the error messages that display if the ATM does not contain enough cash or if the account balance is too low. UML sequence diagram Returning to the Withdrawal class diagram, we can add the fee property and set its default value: UML class diagram We’ll make a first pass through implementation of the fee logic without including the user cancel option. Updating the source code from our model adds the fee property to the Withdrawal class. Then we’ll jump into our favorite source code editor to implement the fee logic directly in the Withdrawal.java file. Testing our recompiled application shows the following: ATM Simulation The starting balance was $147. After withdrawing $100, the new balance is $43. The fee is displayed in a new message, and the ending balance is correct. But now the sequence diagram in our UML model is inaccurate because it doesn’t include the fee feature. We can correct the sequence diagram by updating the UML project from the revised source code. The UModel Messages window indicates that changes in the Withdrawal.java file caused the sequence diagram to be regenerated. And, we can easily navigate the diagram to locate our new test of the withdrawal amount to see if the fee needs to be increased to $4. image10a Now that our modified sequence diagram graphically represents updated operation of the ATM, we can be assured the harried driver we met in Part 3 of this series has enough cash to buy that ice cream cone! In our next installment we’ll take advantage of another UModel feature to generate rich project documentation for our work so far – one more advantage of keeping our UML model and application source code synchronized. If you’re ready to try Altova UModel on your own Java, C#, or Visual Basic legacy application, click here to download a free fully functional 30-day trial.

Tags: , , , , , , , ,

Part 3 – Analyzing a Legacy Application with Altova UModel


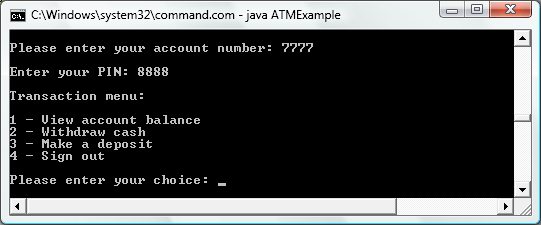
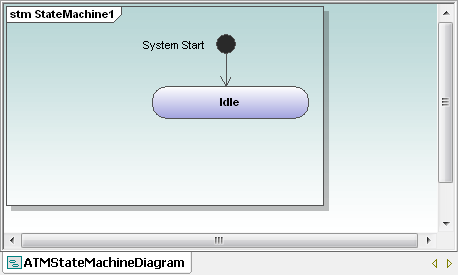
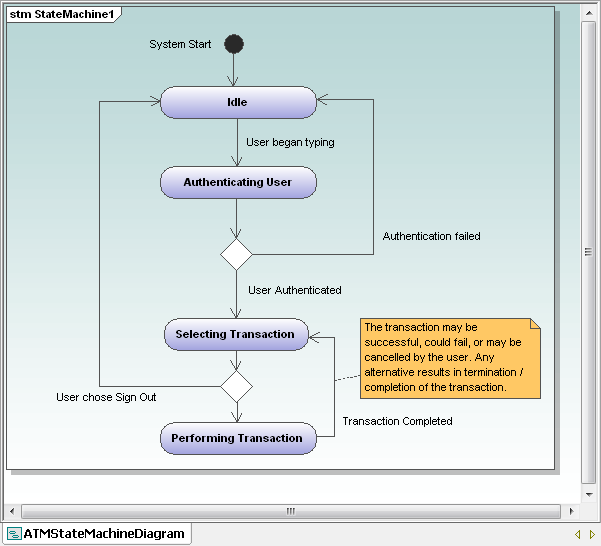
In Part 1 of this series we applied the reverse engineering functionality of Altova UModel to import source code from an existing ATM simulation application. We created a UML class diagram to illustrate the application’s class hierarchy and class relationships. In Part 2 we drew a UML use case diagram to document user interactions with the system and we drew several additional use case diagrams to document interaction details and a planned enhancement. In this installment we’ll look at the ATM from another point of view. On a hot summer afternoon, a harried driver spots an ice cream stand with a drive through lane up ahead. Just one problem – no cash! So he turns in at the strip mall parking lot and parks by an ATM in a glass kiosk. Before he even gets out of the car, our overheated bank customer wonders about the state of the ATM. Is another customer with complicated banking business already using it? Even if no one is inside kiosk, could the ATM be out of service? A UML state machine diagram (also called a state diagram) will let us map the states of our simulated ATM and the triggers, events, and transitions between states so we can better understand how our legacy application operates. Let’s return again to our experience running the simulation to get started: ATM Simulation Log In menu ATM Simulation Transaction Menu When we launched the legacy application, our simulated ATM entered its idle state, awaiting the first customer: UML State Machine Diagram start Next, it can be helpful to identify and draw additional states in disconnected ovals. We’ll be able to move these ovals around like pieces of a puzzle to find the logical sequence without worrying about the transitions from one state to the next. UML state machine diagram - preliminary This preliminary list of the ATM states is only our first rough draft. The state descriptions were suggested by our legacy application’s menu entries, and it’s obvious we can simplify: · There is no difference between Selecting First Transaction and Selecting Next Transaction, so these should be combined · Logging Out is probably not a state, but an instantaneous transition when our user presses 4 at the Transaction menu · We can assign user entry of a withdrawal amount or a deposit amount as sub-states within the Performing Transaction state The third item simplifies our diagram and would also be consistent with our treatment of user entry of the account number and PIN as part of Authenticating User. After we make these changes and add transitions, our diagram looks like this: UML state amachine diagram with transitions The simple transitions we’ve added are triggers that cause the ATM to leave one state and enter the next. Also, notice every state has at least one entry and one exit – otherwise the legacy application could force our user into a dead end. The diamond element between Selecting Transaction and Performing Transaction is the UML symbol for a choice of flows. At first it may seem illogical for the application to allow the user to sign out before performing any transaction, but that is an option our legacy application offers in the Transaction menu. And users in the real world have been known to change their minds at the last minute! We were careful to use consistent language wherever possible for our element names and descriptions. The states are named with verbs in the present tense that end in -ing. Transitions are labeled to indicate completion of the action that causes the state to change. Consistent element naming enhances diagram clarity. Once we have a working overview state diagram like the one above, it’s worthwhile to consider what happens if a transition is attempted, but not completed successfully. The ATM user might enter an invalid account number/PIN combination, or an authenticated user could request a withdrawal amount that exceeds the account balance. We can enhance our state diagram to include these possibilities: Complete UML state machine diagram Now our state machine diagram shows many alternate paths through the application execution, not just the single, all-successful “Happy Path.” We chose a vertical orientation for the layout of our diagram, but there is no rule dictating that form. Some applications will lend themselves to a horizontal layout, or maybe that is simply your personal preference. This illustration shows a small portion of our state machine diagram in horizontal form: UML state machine diagram in horizontal layout Whichever state machine diagram layout you choose, you should not draw transition lines that intersect or overlap. Drawing a UML state machine diagram may seem like overkill for our ATM simulation, since the legacy application is small, and we are all familiar with the way ATMs work. However, these techniques can be very illuminating when you have to work on a much larger application operating in an unfamiliar or complex subject domain. If you are ready to create UML state machine diagrams for your own Java, C#, or Visual Basic legacy application, click here to download a free fully functional 30-day trial of Altova UModel. In our next installment we’ll look in detail at the withdrawal transaction and the new feature we planned in Part 2.

Tags: , , , , , , , ,

Analyzing a Legacy Application with Altova UModel – Part 1


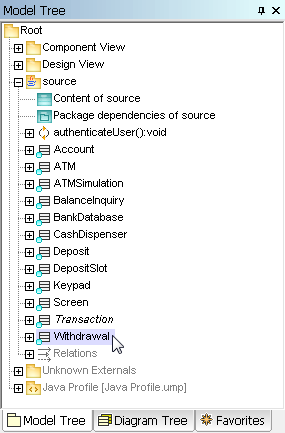
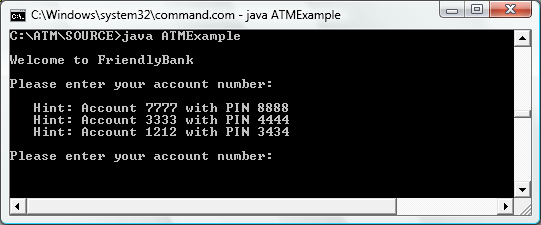
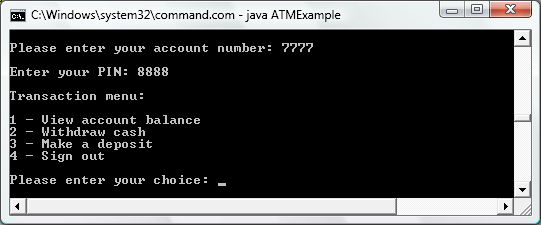
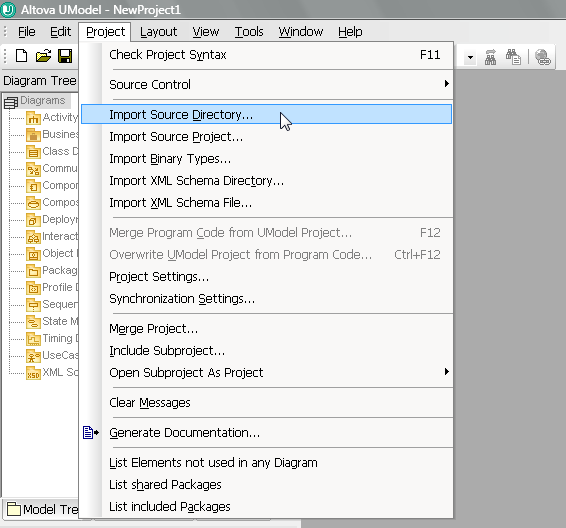
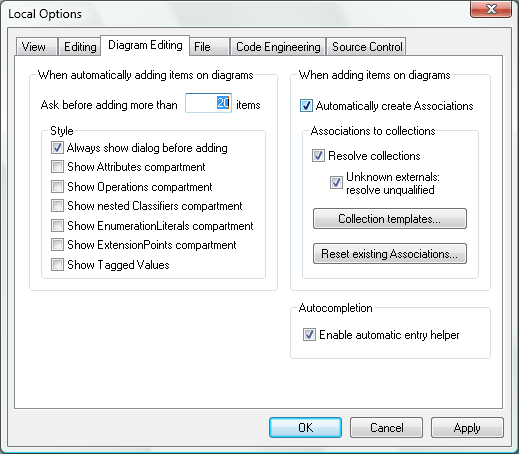
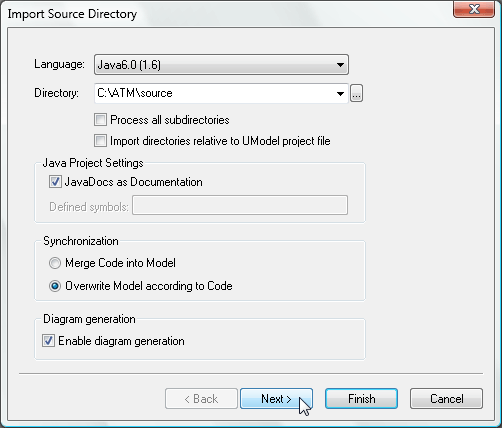
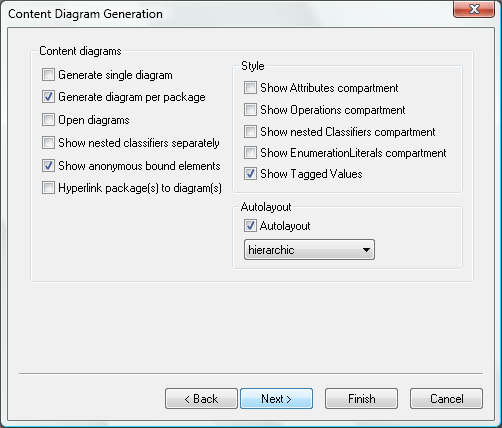
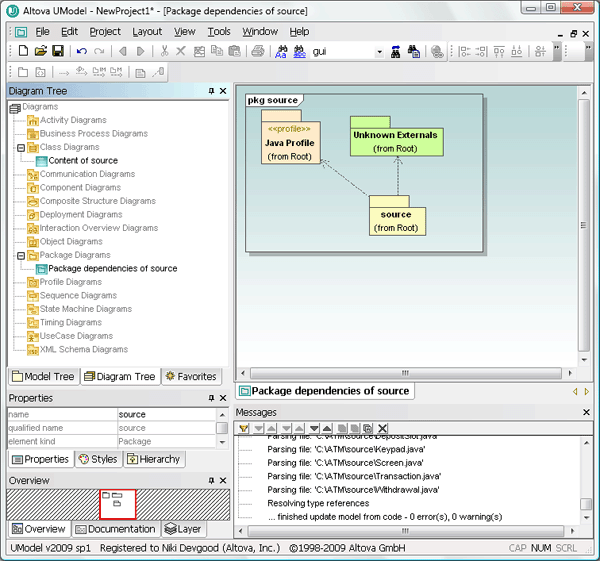
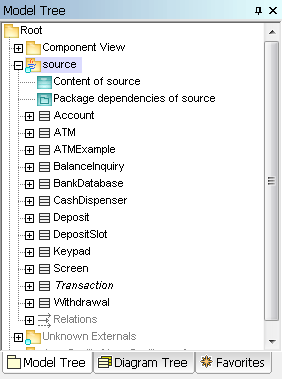
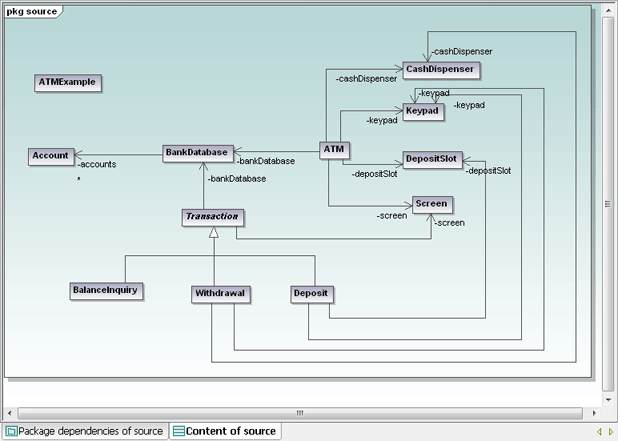
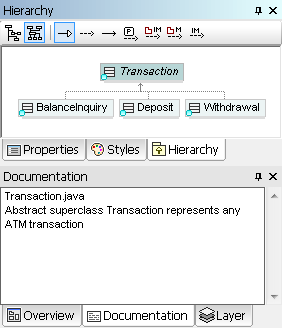
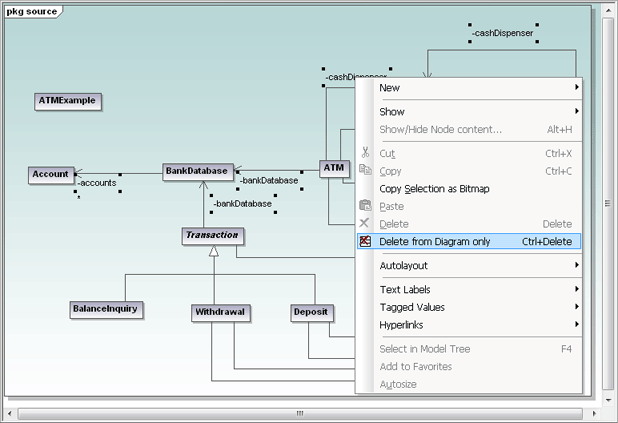
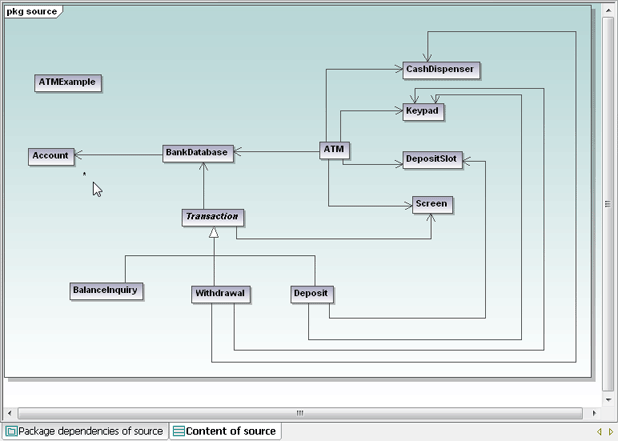
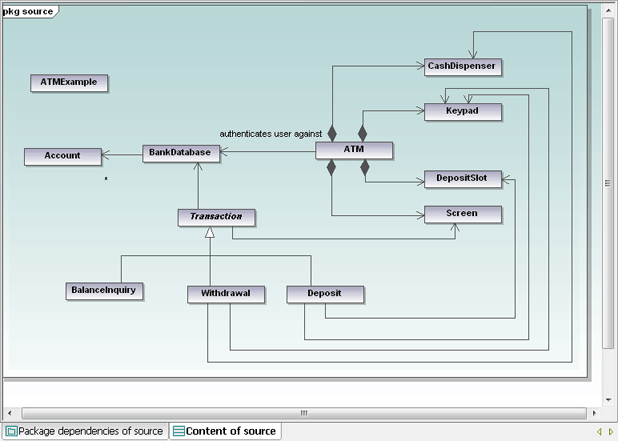
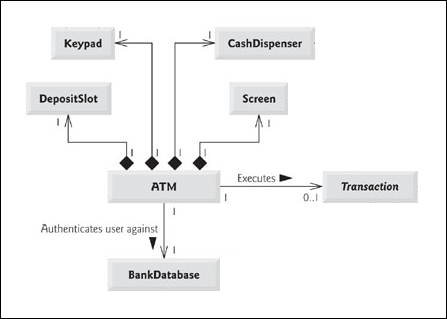
Sooner or later nearly every professional developer will be assigned to debug or add features to an existing application the developer did not help create. In these situations, inaccurate or incomplete documentation and lack of access to the original development team can pose huge obstacles. Fortunately, Altova UModel can reverse-engineer existing software to create a visual model that accelerates analysis and improves comprehension of a legacy application. This is the first of a series in posts where we will apply UModel, Altova’s UML tool for software modeling and development, to analyze an ATM (Automatic Teller Machine) simulation written in Java. The application is based on several ATM examples from popular Java tutorials. Since it is small and the operation of an ATM is familiar, we will focus more on techniques you can apply to your own Java, C#, and Visual Basic projects, rather than the example code. Here is a view of the legacy application running in a command window: Analyzing a Legacy Application with Altova UModel The original developer conveniently provided the sample account information, so we can log in. The application then presents a familiar ATM transaction menu: Analyzing a Legacy Application with Altova UModel If we inspect the folder containing the application, we see Java source files and compiled .class files, but no project files. Analyzing a Legacy Application with Altova UModel That’s not a problem. The UModel Project menu lets us import a project, a source directory, or even the binary files of a compiled application. Source code for very large projects is likely to be organized in multiple folders, so even when you have a project file, you may want to investigate one folder at a time. Altova UModel Project Menu Before we start, we’ll want to make sure to set the UModel Options to automatically draw any class associations defined in the source code: Altova UModel Options dialog As we import the folder, we’ll also want to include any JavaDocs comments in the source code as Documentation for our UModel project: Altova UModel Import Directory options For our first look at the legacy application we’ll want a high-level overview, so we won’t open all the optional compartments: Altova UModel diagram generation options UModel imports the project in just a few seconds, and the message window reports no errors. The Diagram Tree contains two diagrams: Altova UModel reverse engineering project We can click the Model Tree tab and expand the source folder to view icons representing all the Java classes UModel imported: image9 We can go back to the Diagram Tree to open the Content of source UML class diagram. After setting all the line styles to orthogonal and repositioning a few lines and classes to avoid overlap, we see the diagram clearly illustrates the application classes and their relationships: Altova UModel UML class diagram Note the name of the Transaction class is in italic, indicating it is an abstract class (or super class), and the BalanceInquiry, Withdrawal, and Deposit subclasses inherit its features. If you click the Transaction class to select it, inheritance is illustrated in the UModel Hierarchy helper window and any JavaDoc comments appearing in the source code immediately before the class definition are displayed in the Documentation window: Altova UModel Hierarchy window If we were using only a text editor to examine the legacy application, we would need to look into every single source code file to understand the hierarchy image shown above. That’s because the Transaction class does not internally identify its subclasses. When we do locate one subclass, it does not identify its siblings. And we can’t be sure some other illogically-named class is not a subclass of Transaction until we look at them all. You can also select each class individually to examine its documentation in the Documentation window. Or, if you prefer a cleaner diagram, you can remove the association labels from the diagram only: Altova UModel right-click context menu Now the asterisk representing the definition of “zero to many” multiplicity of Accounts in the BankDatabase is much more apparent. Altova UModel UML class diagram Another member of our development team found a partial class diagram purporting to represent the legacy project and passed it on. We can immediately see it does not look like the diagram UModel generated: UML class diagram for legacy application The documentation for our legacy app does not match the code – an unfortunate but common event! There are several differences between the old diagram and the one we generated:

· The associations between ATM and the physical components are shown as composition associations

· The association between ATM and the BankDatabase is described by a text annotation

· The association between ATM and Transaction also has a text annotation, and it does not even exist in the UModel diagram

· Multiplicity is defined at each end of each association, but none were created by UModel

Let’s consider each point:

· The representation of composition in the Java language is identical to ordinary association, so UModel could not deduce the composition characteristic. Of course the ATM “is composed of” a keypad, screen, cash dispenser, and deposit slot, so we can update the diagram to show composition.

· We can add a text annotation to any UModel association arrow. Simply click the arrow and start typing.

· If UModel did not create an association arrow between the ATM class and the Transaction, one must not be defined in the source code. We will postpone further investigation of this anomaly for now. · Multiplicity as shown in the legacy diagram would also require specific definition in the source code. We’ll leave this for investigation later too. Maybe that old diagram was left in the back of the file cabinet for a reason!

We’ll add the annotation, then update the aggregation characteristic of each ATM association in the UModel properties window. Let’s also use the UModel Layout toolbar to make the rectangles representing all the classes the same size. Now our class diagram looks like this: Modified UMLclass diagram for ATM project The completed class diagram just gets us started on our analysis. In the next installments we’ll drill deeper into the application code, automatically generate more UML diagrams, and draw some new diagrams of our own as our understanding of the existing code increases. If you want to jump in right away and reverse engineer your own Java, C#, or Visual Basic legacy app, click here to download a free, fully functional 30-day trial of Altova UModel.

Tags: , , , , , ,

Altova UModel adds Business Process Modeling, Layers, Java 6.0, C# 3.0, and VB 9.0, plus much more in v2008r2


The Altova UML tool for software modeling and application development keeps getting better and better, with recently launched UModel Version 2008 Release 2 adding exciting new features including support for business process diagrams in BPMN notation, code engineering support for Java 6.0, C# 3.0, and Visual Basic 9.0, diagram layers, enhanced auto-completion, and much more. We can’t wait to see how users take advantage of the new layers feature: In UModel 2008 Release 2 you can assign each diagram element to a specific layer and set each layer to be hidden or visible. Just imagine how you could take advantage of layers to build simplified views within complex activity diagrams, state machine diagrams that contain superstates and substates, to identify the roles of different parties in business process diagrams, or in virtually any UML diagram that grows to more than two dozen or so elements!

Tags: , , , , ,

Altova Releases Version 2008 of its Award-winning Software Product Line


Altova, creator of XMLSpy and other leading XML, data management, UML, and Web services tools, today announced the availability of Version 2008 (v2008) of its award-winning line of software development tools. With the release of its v2008 products, Altova introduces a host of powerful new capabilities, including support for the Widows Vista operating system across the product line, extended support for Office Open XML file formats in XMLSpy, more data mapping versatility in MapForce, and enhanced database functionality in StyleVision. Additionally, this new software version brings Visual Basic .NET code engineering and real-time integration with Visual Studio and Eclipse in UModel, support for editing database views and stored procedures in DatabaseSpy, one-click directory synchronization in DiffDog, and much more.

Tags: , , , , , , , , , ,