Exporting Products from Shopify as CSV
Shopify is a massively popular ecommerce platform in wide use by retail businesses large and small. Though Shopify provides easy-to-use tools for setting up and running an online storefront, managing the vast amount of data behind the scenes, such as product catalogs, customer information, order records, and inventory, can quickly become complex.
Businesses often need to integrate Shopify data with backend databases, ERP systems, CRMs, data warehouses, or other platforms to streamline operations, perform deeper analytics, or support automation workflows.
This is where a data mapping tool with Shopify support becomes essential, allowing businesses to transform, map, and move data between Shopify and other systems efficiently and accurately.
Let’s look at an example of a common scenario – extracting product data from Shopify to a CSV file – using visual tools in MapForce.
How Can You Get Data Out of Shopify?
While Shopify provides the tools businesses need to set up and manage their storefronts, getting the data they need for other tasks out of the platform is a bit more complicated.
Shopify has historically provided multiple APIs and tools designed to help developers access and export data, but they have recently standardized on GraphQL as the preferred API format. In fact, they will soon require that all new Shopify apps use GraphQL. The GraphQL approach allows for highly targeted queries, allowing merchants to request only the specific data they need in a single API call, which improves performance and reduces any unnecessary data transfer.
Shopify offers two main GraphQL APIs to help developers or IT pros access shop data:
Shopify Admin GraphQL API: This is the primary API for backend operations. It provides access to storefront data such as products, orders, customers, inventory, fulfillment information, and more. Developers can use the Admin GraphQL API to extract and map data to other systems.
Shopify Storefront GraphQL API: While the Storefront API is primarily used to power custom shopping experiences and front-end applications, it also gives access to public-facing store data like product listings, collections, and checkout flows. This is especially useful for businesses that want to integrate Shopify data into customer-facing platforms, like custom mobile apps.
Using MapForce to Integrate Shopify Data
Developers can use MapForce to integrate Shopify data with other data formats and systems by creating custom mappings that directly call these GraphQL APIs. With support for Shopify calls as the source or target of any data integration project, MapForce acts as a bridge, transforming Shopify’s data structures into the formats required by the target data structure – or vice versa.
To get started, developers must create a custom app within their Shopify store. A custom app provides the necessary API credentials and permissions to securely interact with Shopify’s APIs. Unlike public apps listed in the Shopify App Store, which are offered by Shopify partners for general use, custom apps are developed specifically for a single store’s private use case and are not available to other stores. This gives businesses full control over how data is accessed and used in their data integration or ETL projects.
Connecting MapForce to GraphQL APIs
To integrate Shopify data into other systems using the Admin or Storefront GraphQL API, there are several key steps that shop owners need to complete within Shopify:
- Enable Custom App Development Shopify restricts custom app creation by default to help protect merchants from unauthorized API access. Before creating a custom app, the store owner or administrator must first enable custom app development in their Shopify admin settings.
2. Create a Custom App (“Develop apps”) Once custom app development is enabled, the next step is to create the custom app itself. This is done through the “Develop apps” section, where the store owner or developer can define a new app specifically for API integration purposes.
3. Assign the Correct API Access Scopes Shopify uses granular permission scopes to control what data an app can access. Depending on the business use case, the app will need to be granted the appropriate Admin API or Storefront API scopes (e.g., read_orders, write_products, read_customers).
4. Install the Custom App in the Shopify Store
After the app is configured and scopes are assigned, it must be installed directly into the Shopify store. This installation process generates the necessary API credentials, including the API access token.
5. Retrieve and Store the API Access Token
The access token provides secure, authenticated access to the Shopify APIs. This token will be used by your external data mapping tool to authenticate API requests.
Map Shopify to CSV
Now let’s take a look at an example GraphQL mapping in MapForce. This mapping project fulfils a common requirement: extracting Shopify product data to a CSV file for uploading to another system or even just to pop it into Excel for analysis.
When inserting a Shopify component in a mapping project, MapForce walks you through the process of entering your shop name, selecting the Admin or Storefront API, and entering your API access token. Next, you can define the connection settings, configure the HTTP security settings (if necessary), add relevant header parameters, and create a query or a mutation.
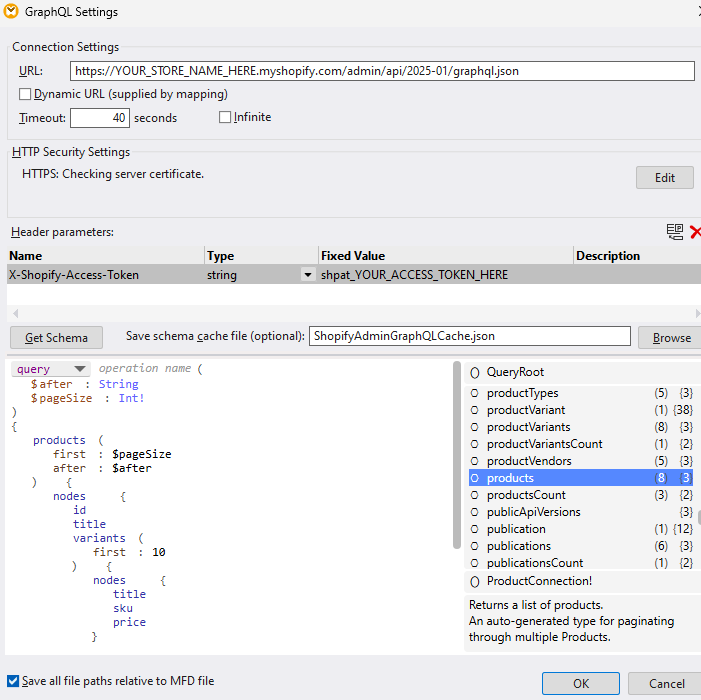
To do that you can build the GraphQL query on the left dynamically by selecting elements from the available options on the right, which will guide you through the process. You can also press the Get Schema button to ask MapForce to automatically create the JSON schema definition for the API response based on the server’s introspection and the GraphQL query (and you can save a cached version of that schema locally for future use when opening the mapping).
For this example, we will use a query for products and we’ll specify what data we will want to have returned for the respective nodes on the left side as we build the query: id, title, and variants with their respective sku and price. We’re not going to cover all the details of how GraphQL works in this blog post, but there are plenty of online resources available, such as https://graphql.org/learn/ and https://www.shopify.com/partners/blog/getting-started-with-graphql that you can use to learn more about it.
Next MapForce inserts the Shopify call as a graphical component that displays the structure of the API request and response.

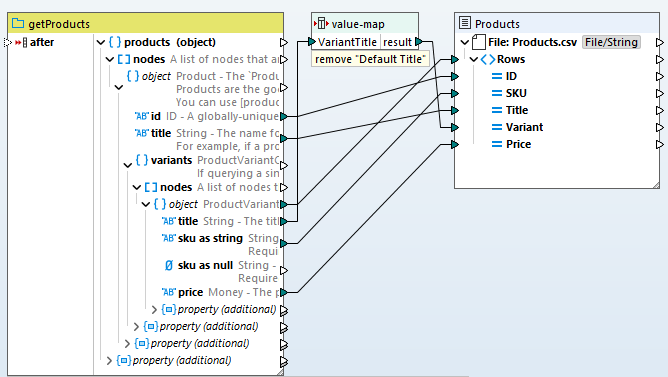
This is the point where it gets a bit tricky: since the Shopify GraphQL API is based on pagination and only returns a certain number of results per call to the API (= one page of results), we will need to call the API multiple times to retrieve all the resulting nodes from our query. We are going to do that by wrapping this API call in a custom function we are calling getProducts, which we can then call recursively if there are additional pages of results to be retrieved.
This is what you can see on the right bottom corner of the mapping inside the getProducts function:
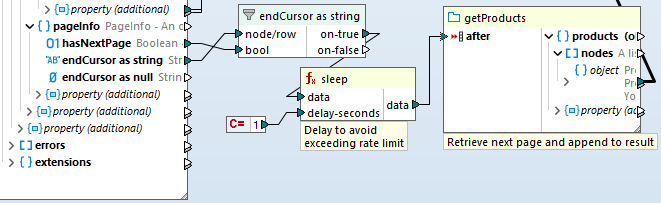
Basically, when the first call to the API returns true under hasNextPage, we are going to call the same function again recursively with the $after variable set to the endCursor position returned by the previous call to the API. We’re also going to sleep 1 second between API calls to avoid exceeding the API rate limit.
And, obviously, the result of that recursive call to getProducts is also appended to the result of the outer getProducts function, so that in the end we return all the results to the main mapping.
By wrapping the actual API call in this getProducts function, we are also achieving a really nice and clean design for the actual main mapping where we take the results form the API call and convert them into the resulting CSV file:
This sample project ships with MapForce, and you can enter your own Shopify store name and access token to run it. To do that, open the Shopify_ExportAllProducts.mfd example from the examples project, then double-click on the getProducts function, and finally double-click on the Web Service POST call object. This is where you need to enter the URL for your shop as well as the correct string for your Shopify Access Token.
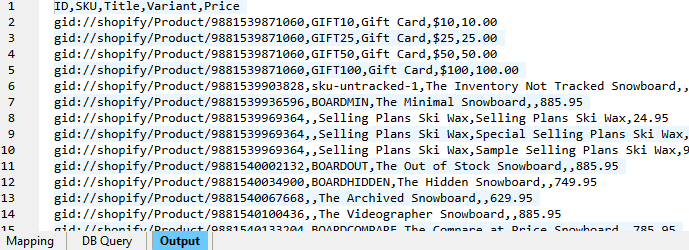
Once you have done that, you should be able to switch to the Output tab and see a preview of the list of all your products being generated in CSV format.
You can save the output directly or deploy this mapping project to MapForce Server for high-performance automation.
Graphical tools in MapForce make it easy to export data from Shopify to CSV as well as other formats like XML, databases, Excel, and more.
Try it for your self with a free 30-day trial of MapForce.
Read more about Shopify data integration in our article about creating a mobile app for capturing inventory information and mapping it to Shopify in real time.